Google Docs is one of the most popular online services for word processing. It is a very convenient program so that you can work with your colleagues or friends on various joint projects. Google Docs provides you with many different tools for smart work.
One such tool is the document history viewer. You can see who is making changes to your file and when. You can also roll back to a previous version at any time, or save the current version to come back to it later if it looks like the best version.
What is Google Docs version history?
Google Docs Version History is a tool that allows you to view the history of changes to your document. It is especially convenient and useful when working with other authors on your text. This tool allows you to get full access to a previous version of Google Docs. You can view it or restore it.
You can also see exactly which user made the changes in this version of the document, and the exact time when these changes were made. This is useful primarily when working in a team. You can track changes made by other team members.
Another interesting feature is the ability to give a specific version a name. If you have a version of the text that you think is good, but you are thinking of making a few more changes, you can save it and give it a title to come back to later. Each new version is created after automatically or manually saving the document. It will be especially handy to use this feature in tandem with the ability to suggest changes in Google Docs. It is also worth noting that it is currently impossible to delete the version history.
How you can see Google Docs version history?
As I wrote above, you can access all versions of your Google Docs. You can access the version history at the moment only with the desktop version of the Google Docs app A new version is created the moment your document is saved. This can be autosaved or manually save in your document. In order to see the version history of Google Docs you need to:
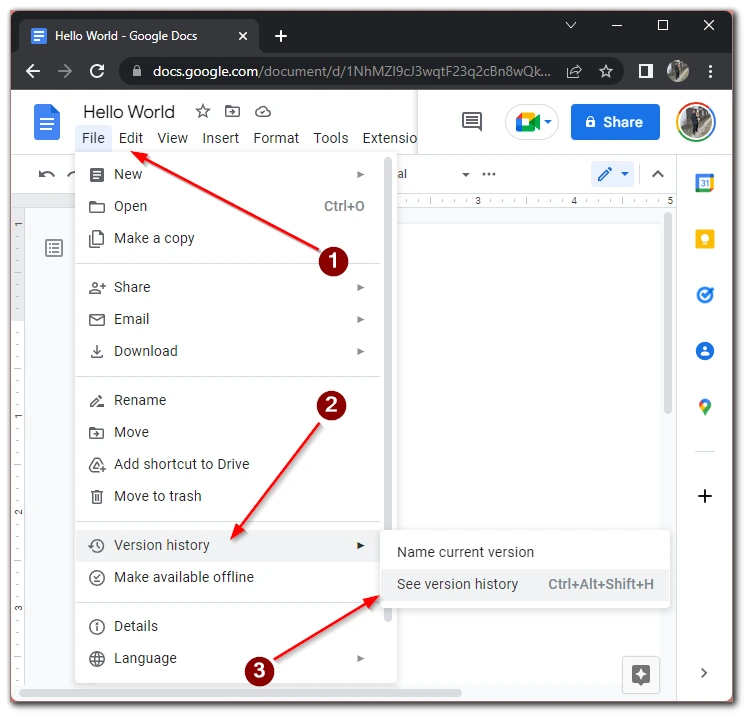
- Click the File button at the top of the Google Docs website.
- Then hover your mouse over Version History. In the pop-up menu, you need to click on See version history.

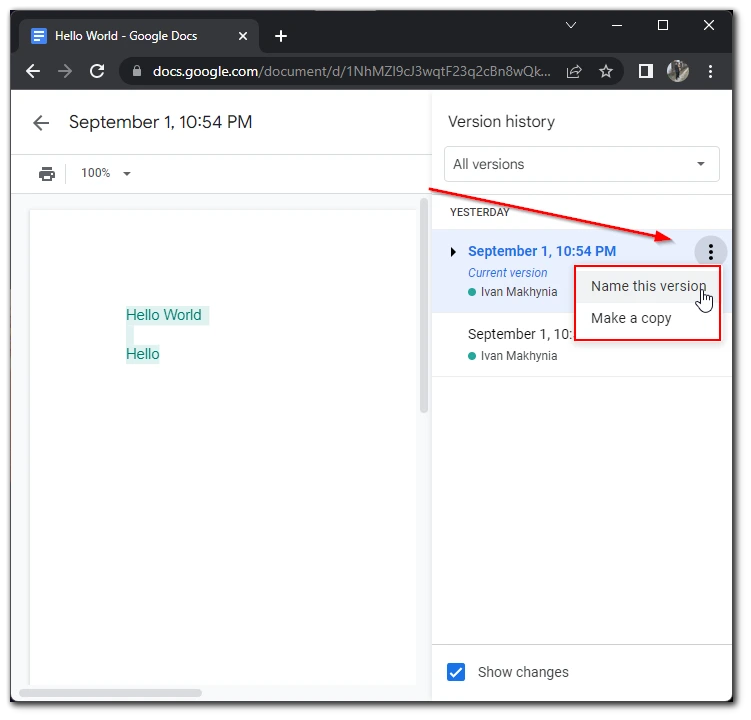
Then you will see a tab on the left side of the screen with the version history of your document. You can also open the history by pressing Shift+Alt+Ctrl+H on your keyboard. In the history tab, you will see a list with all the versions and the names of the participants who made the changes. It also shows the exact time when the changes were made. To switch to the version you want, just click on it.
How to name a Google Doc version
Another interesting feature is the ability to give a specific version of your document a name so you can find it at any time and access it. You can do this in 2 different ways:
- Click on File at the top of the screen above the toolbar.
- Then hover over Version History and choose Name current version from the drop-down menu to name the current version of your document.
- If you need to name an older version, go to Version History with Shift+Alt+Ctrl+H or the instructions from the previous list.
- Then click on the three dots next to the version you want and choose Name this version. You can also make a version copy.

In the version list, you can choose a filter on top to display only versions with names. This is useful if you are not sure of the formatting or content of your document and you rewrite it several times. You can then go back to any of the versions at any time.
Read also:
How to share a Google Doc
To keep track of who made what changes in Google Docs, you first need to add other participants to your Google Docs. It’s pretty easy to do, you can add people with a link or a direct invitation to their Gmail. To do this you need to:
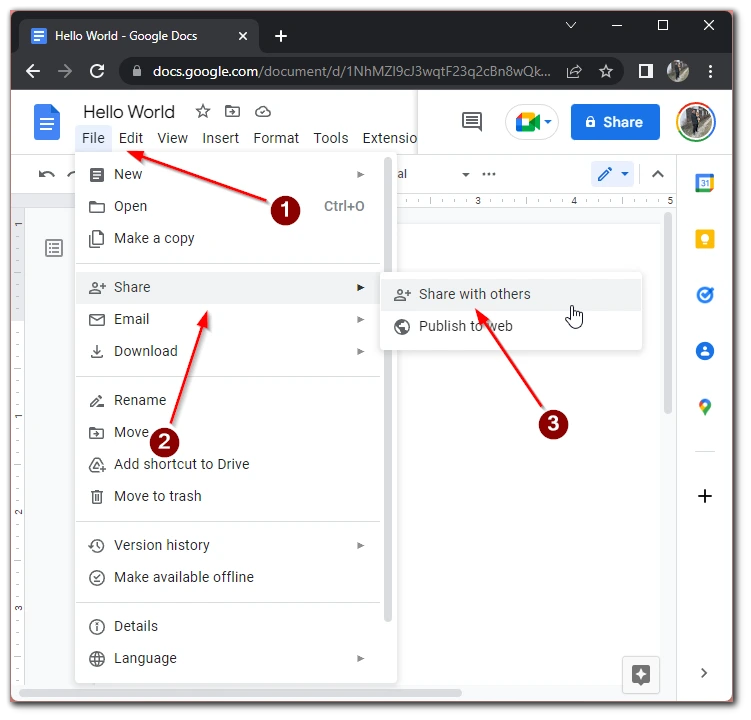
- At the top of the screen above the tools bar, click on File.
- Then hover over Share.
- In the pop-up menu, click Share with others.

- In the next menu, you will see options on how you can share. By using an automatic Gmail invitation or by copying the link and sending it directly to your colleague.
You can also set up permissions for different users. You can let them be editors to collaborate on documents or you can make them just commenters so they can leave comments under your text.


