
For quite some time you couldn’t insert an image into a single cell in Excel. This can be useful when making different tables, for example for company presentations or different products. Now Microsoft has finally added this feature. However, for now, it is only a test function in its beta program.
You can use a special function =IMAGE() where you add a picture address and its size, and then Excel will find it and automatically add it to a cell. However, for now, you need to be an Office Insider Program member and install the latest build of Excel in order to use it.
How to insert an image with the IMAGE() function in Excel
Microsoft has begun open testing of a new feature to add pictures directly into cells. To try this feature, you first need to sign up for the Office Insider Program and download the latest build of Excel for Windows or Mac. After that, you need to:
- In any cell, enter the formula
=IMAGE(source, [alt_text], [sizing], [height], [width])where :- Source is the address for your picture on the web
- alt_text – caption of this picture
- sizing – image size
- height – the picture’s height.
- width – width of the image
After that, the picture will be automatically added to your Excel table in a certain cell. Please note that this function at the moment is only supported by a special application on your computer. In the online version of Microsoft 365, you cannot use this feature yet.
How to insert image to spreadsheet in Excel
If you don’t care about linking to a specific cell, you can use the standard Insert tool. This will help you insert a picture directly into the table. Then you can, for example, forbid editing it and putting this picture in the right place. To do this:
- In the top toolbar, click on the Insert tab.
- Then click on Pictures.
- Choose one of the three options:
- Picture on this device.
- Network Picture.
- Picture from Bing.
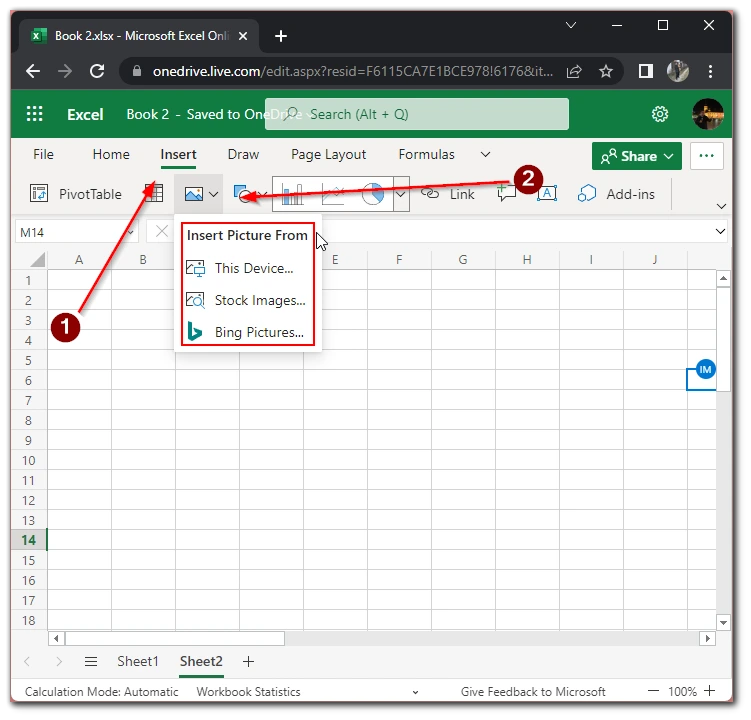
- Next, just specify the path to your picture and it will automatically upload to your document.
You should remember that if you upload a picture from the Internet, and later delete it from the original source, the picture in your table as well will be deleted. This feature is available to all Excel users on any platform. You do not have any restrictions when uploading pictures to excel. However, you should understand that the more media files you upload, the larger your Excel file will be.
What is Office Insider Program
Microsoft releases quite a lot of software. Of course, it’s the Windows operating system, different programs for their gaming division, like the Xbox app. One of the most popular sets of applications is Microsoft Office.
Not surprisingly, Microsoft is constantly developing its Office applications. New updates are constantly coming out and different features are being added to their office suites, such as Excel or Word. Especially for those who want to experience all this functionality first and are willing to help the company with reviews, Microsoft has created its Office Insider Program.
This is a program in which any Microsoft Office user who has a purchased license for their application can participate. Once you sign up for this program, your device will get all sorts of builds with early access to many features. For example the ability to add pictures to the box from the guide above. Similar features are available in Windows itself.
Read also:
- How to switch X and Y-axis in Microsoft Excel
- How to build a bubble chart in Microsoft Excel
- How to make all columns in Microsoft Excel to be the same size
How to join the Office Insider Program
It’s easy to join the Office Insider Program. You can do it from any supported device. It is available on systems such as Windows, macOS, Android, and iOS. To do so, you first need to buy a subscription to Microsoft’s Office suite. After that you need to use your PC:
- Log in to the application of the office program you want. In the tab panel on the left, select the Account item.
- Select the Office Insider drop-down box and pick Join Office Insider.
- Next, in the drop-down box, you need to select which type of insider software you want. You can choose between:
- Current Channel (Preview) – this option is for those who want infrequent updates, but with more stable builds.
- Beta Channel – you need this option if you want to get all options before others and are not afraid of different bugs.
- Then agree to the terms and click OK.
Next, you will need to download updates for your office software and possibly update your Windows system itself. Remember that you will be downloading unstable builds which might contain bugs and errors. You should also expect that you may experience crashes or slowdowns.


