
The Windows operating system has several modes for shutting down your computer: normal mode (which completely shuts down your PC), hibernation mode, and sleep mode. Sleep mode is a method of shutting down your computer whereby your PC technically remains on, but all activity on it’s stopped and all open documents and apps are put into RAM.
How to fix the sleep mode issue on your PC
In simple terms, your laptop or PC stops working, but you can start working on your device at any time in just a few seconds. This mode can be activated by the user, you can simply press any key on the keyboard or touch the mouse and your PC will resume.
However, sometimes your PC or laptop can come out of this mode itself. And there are situations when your PC cannot enter this mode. So it’s very important to set the sleep mode correctly on your windows and the information below will help you with that.
How to fix the sleep mode with the power settings
I think you understand that sleep mode is very important for many users and especially important for laptop users, as this mode saves a lot of battery power. If your laptop or PC doesn’t go into hibernation mode, the first thing to check is whether it’s on, to do this you need to:
- In the search bar, type ‘Edit power plan’. At the top of the list, select the desired icon.

- On the left side, click on ‘Choose when to turn off the display’.
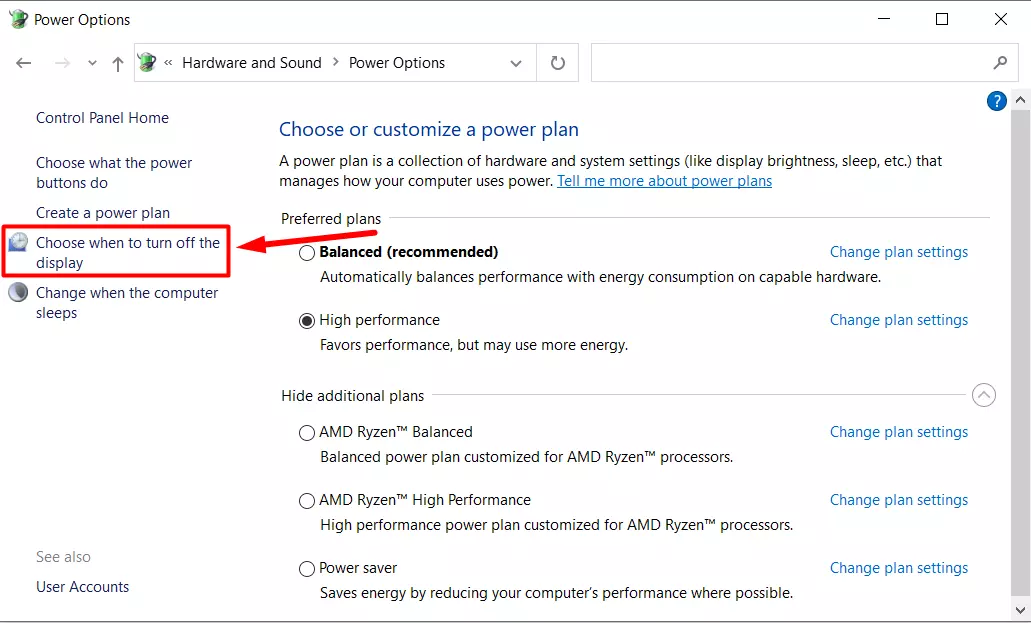
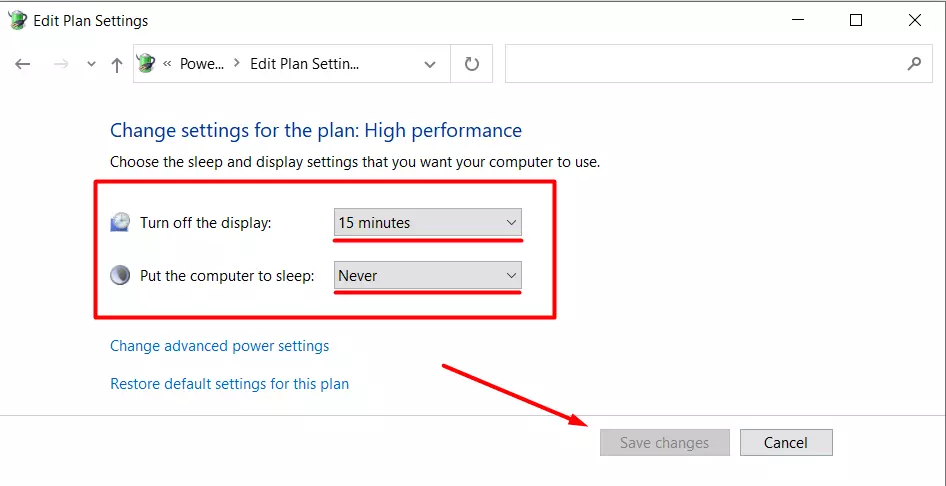
- Here you can set the sleep timer (for monitor and PC) or disable sleep mode if you don’t need it.
There is another way to find out if the hibernate redemption is on. You need to:
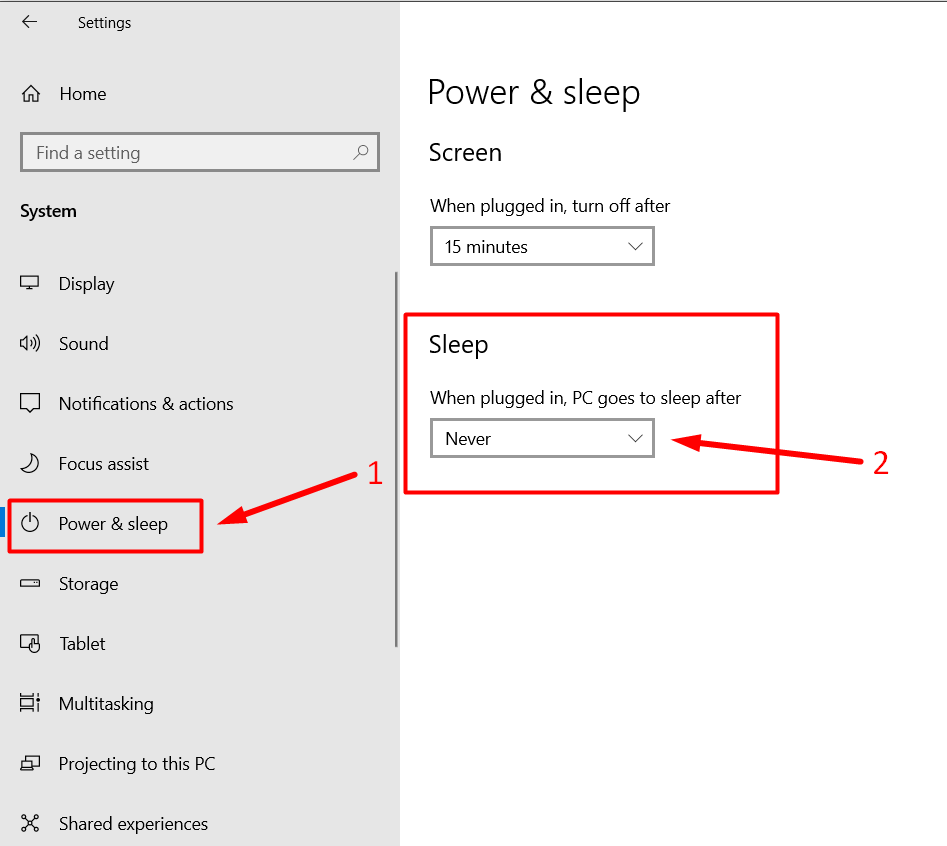
- Right-click on the ‘Start’ menu and go to ‘Settings’.
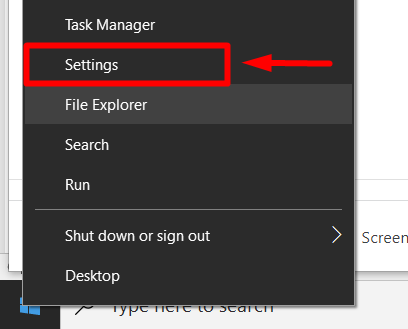
- After the Settings menu opens, go to ‘System’.
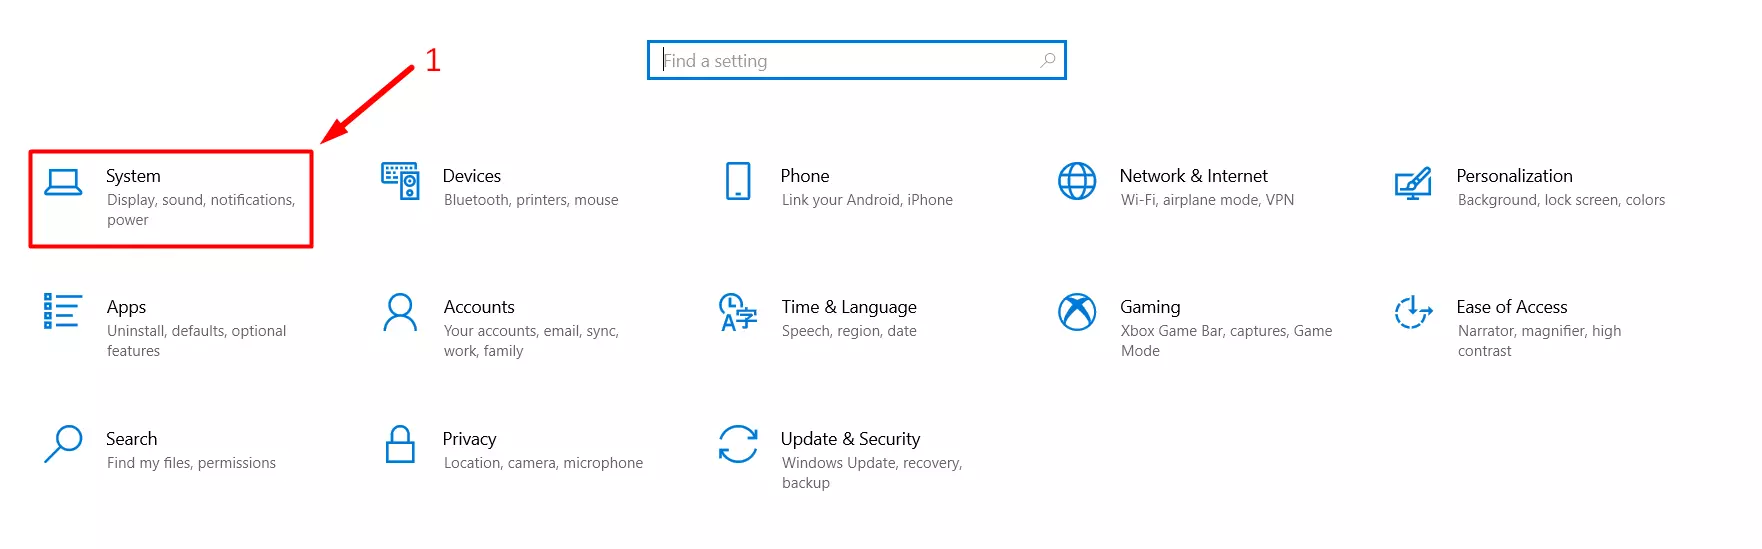
- Then go to ‘Power and Sleep’.
- Here you can also set the sleep mode for your PC or laptop.
How to find out what’s breaking your computer’s or laptop’s sleep
Different programs, adapters, or modules on your PC can interrupt your computer’s sleep or prevent it from going to sleep at all. However, you can use a special command in the Command Prompt to find out what is preventing your computer from sleeping. You can force the problematic adapter or app into sleep and to do this you need to:
- Enter the “cmd” in the text box, right-click on the desired program from the list and run it as an administrator.

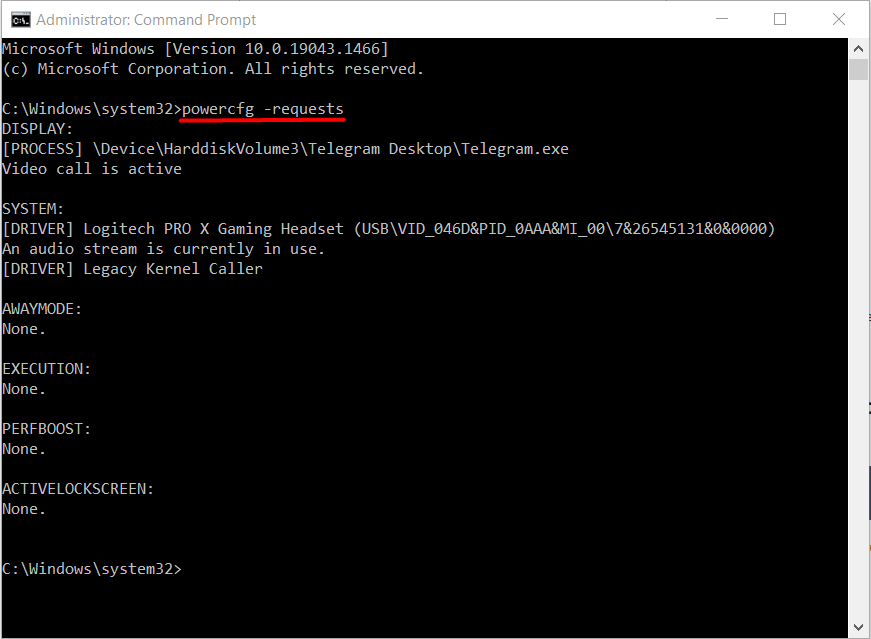
- At the command prompt, you need to enter this command:
powercfg -requests
- Press enter.
Here you can see all possible requests that consume power and can prevent hibernation. In the first example, you can see how the video call and the headphones use power, so my PC cannot enter hibernation mode. In this case, I can turn off the video call and my PC will eventually go into sleep mode.
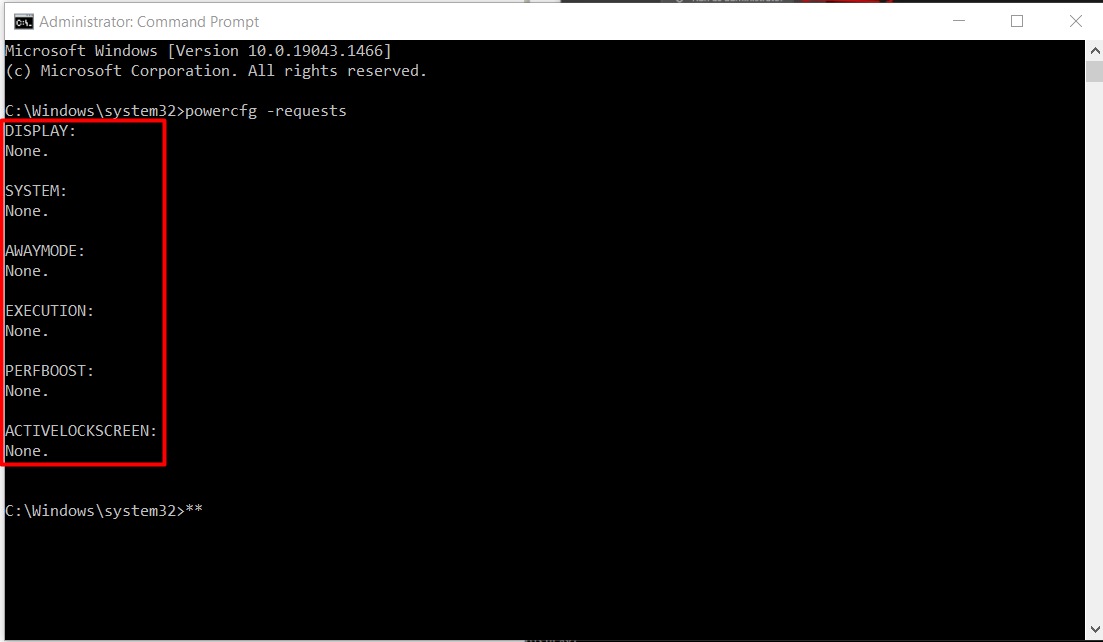
However, if you get the same result as in this screenshot then you have nothing consuming power and you need to look for another cause of the problem.
If you have a situation like in the first case, you need to enter this command:
powercfg -requestsoverride <CALLER_TYPE>“<NAME>”<REQUEST>
If you substitute our value, you get.
powercfg -requestsoverride <PROCESS>“<Telegram.exe>”<DISPLAY>
This should fix your problem.
How to check the events of the last awakening
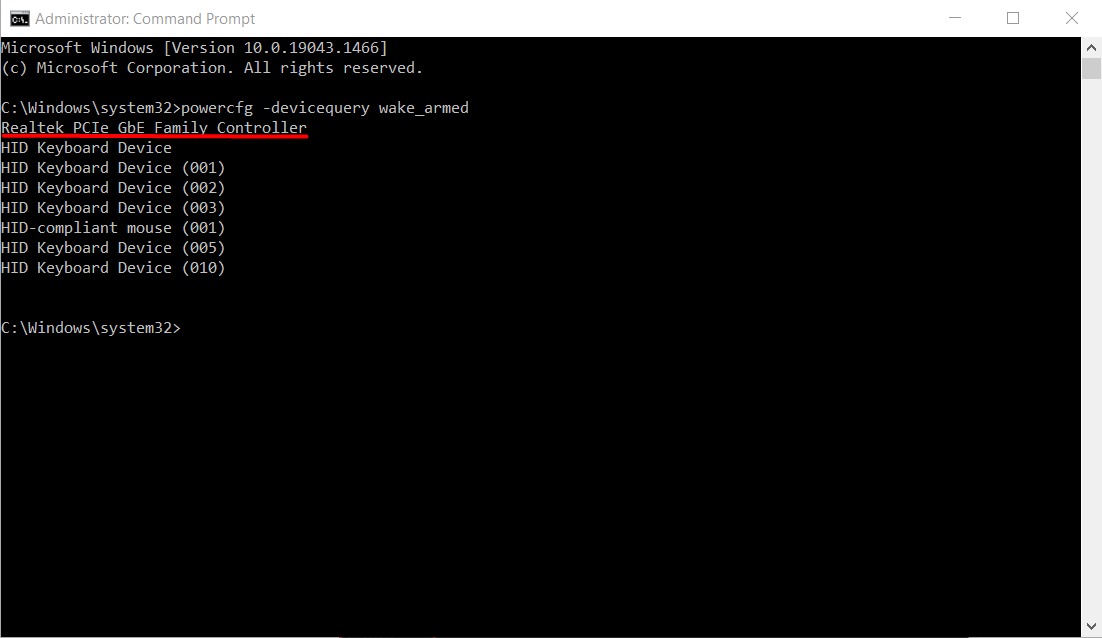
Your PC or laptop may wake up due to some device or adapter, to find out what woke it up you need to enter this command at the command prompt:
powercfg -devicequery wake_armed
- Now you can find the devices or adapters that can wake up your PC.
Often the reason why your PC or laptop cannot wake up is the network adapter. You need to properly configure the network adapter and to do this you need to:
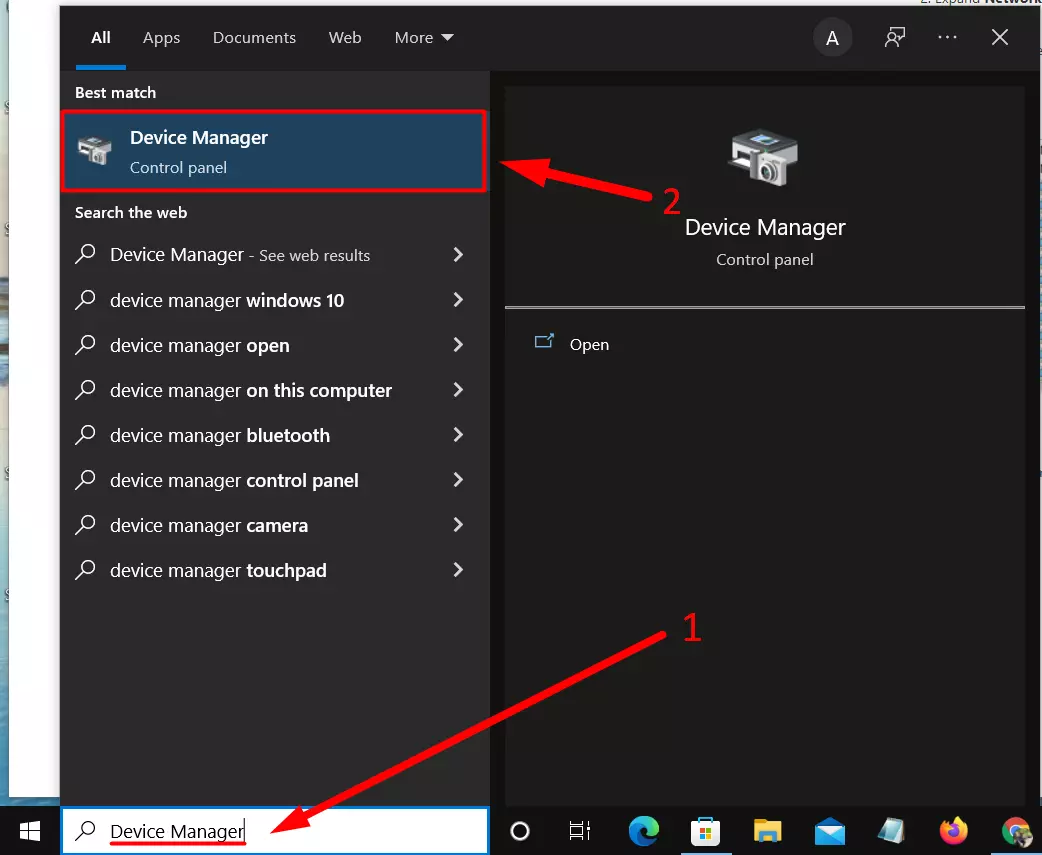
- Go to search and in the text box enter the “device manager”. Select the desired option from the suggested list.
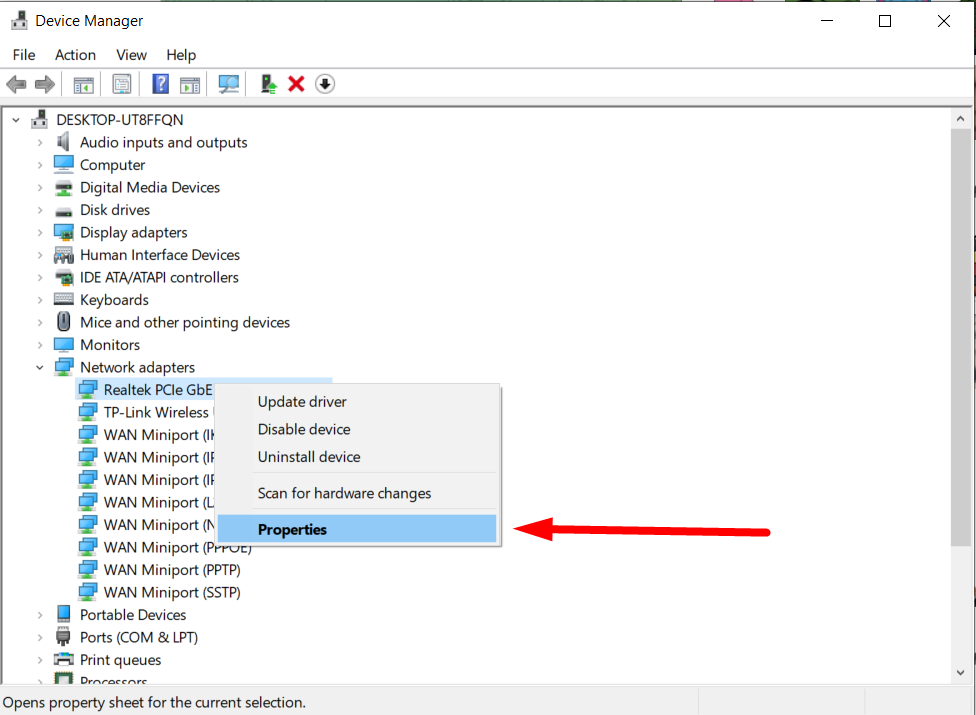
- Find the problematic network adapter and right-click on it, now you need to select ‘Properties’.
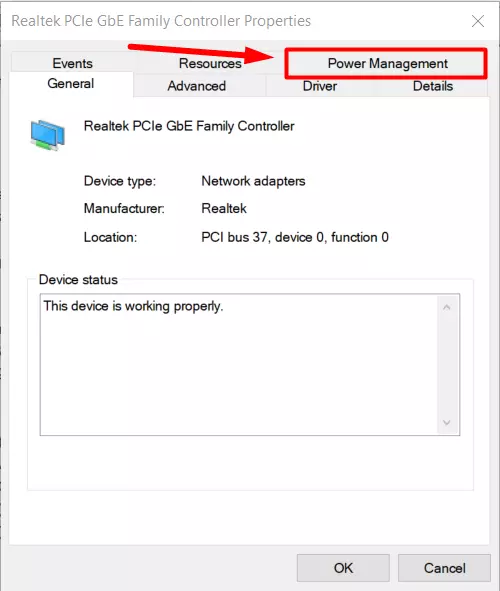
- Go to the Power Management menu.
- Check the box next to ‘Allow the computer to turn off this device to save power’ and then click OK.
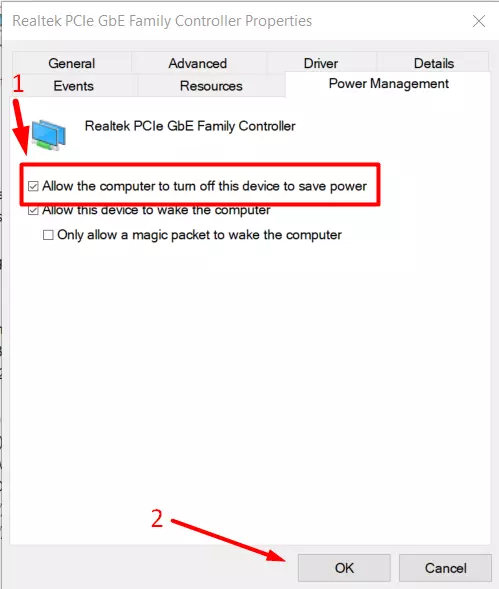
Now, this adapter won’t disturb your PC or notebook when it’s in sleep mode.
How to update the drivers to fix the error with sleep mode
Sometimes outdated drivers can be the reason why your PC wakes up often. So you need to update the drivers on your PC. To do this you need to:
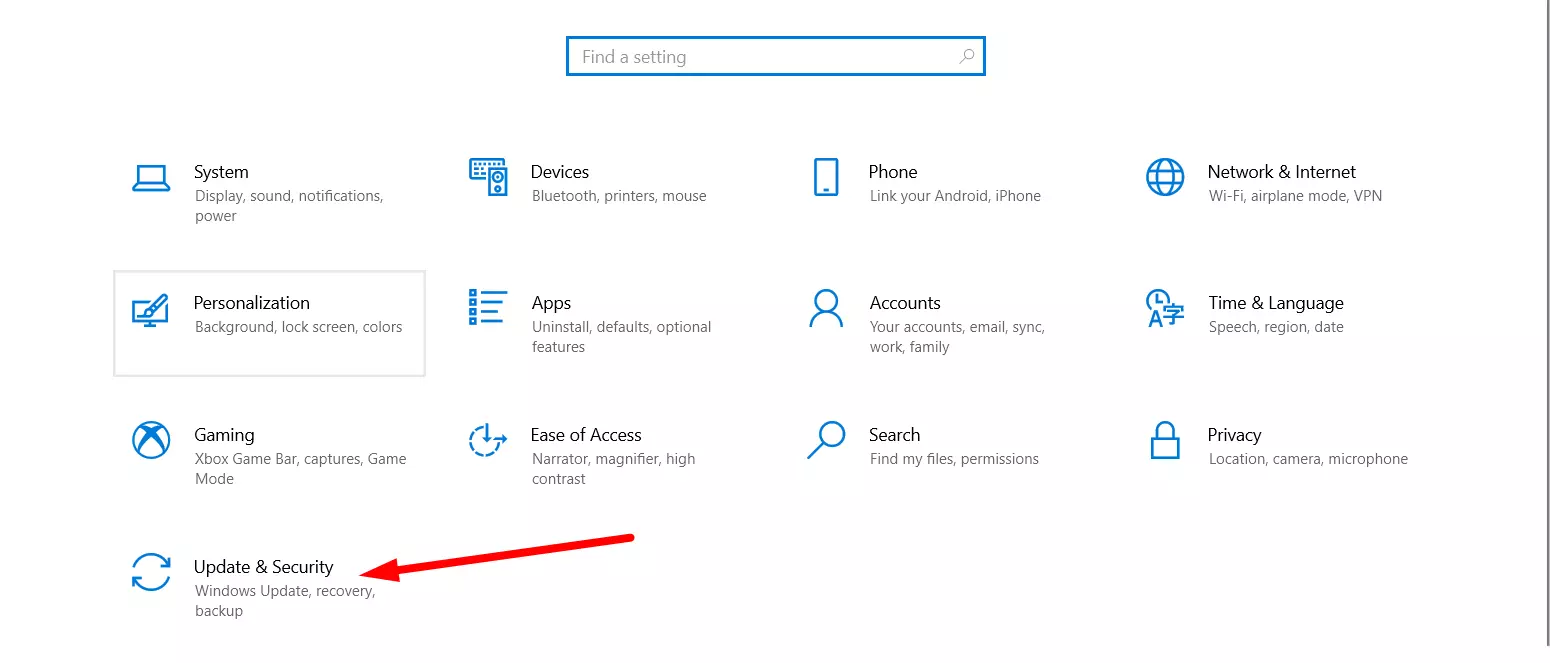
- Right-click on Start and click on ‘Settings’.
- Go to ‘Update & Security’.
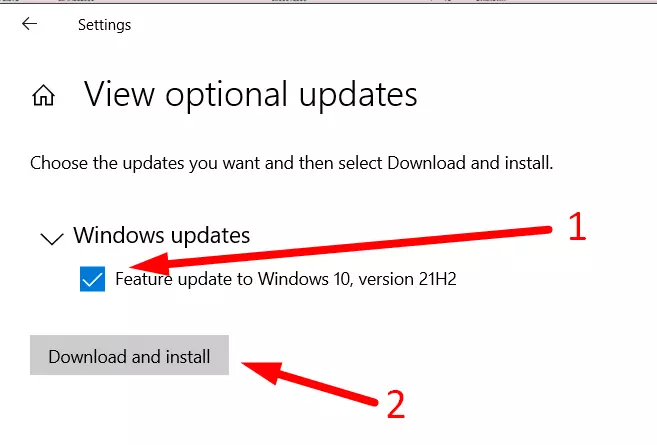
- Then go to optional windows updates.
- Here you will see a list of updates, check the box next to the updates and click ‘Download and install’.
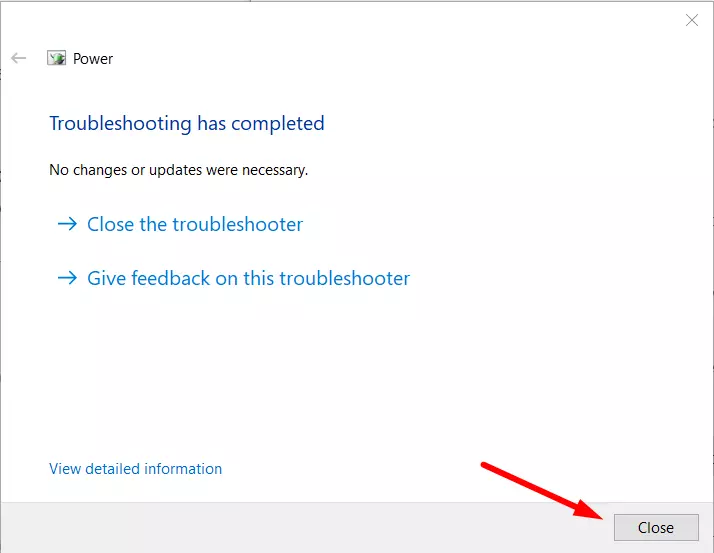
How to run the Power troubleshooter to fix sleep mode
You may have some hidden power issues, and Power Troubleshooter can help you fix them. To run Power Troubleshooter you need to:
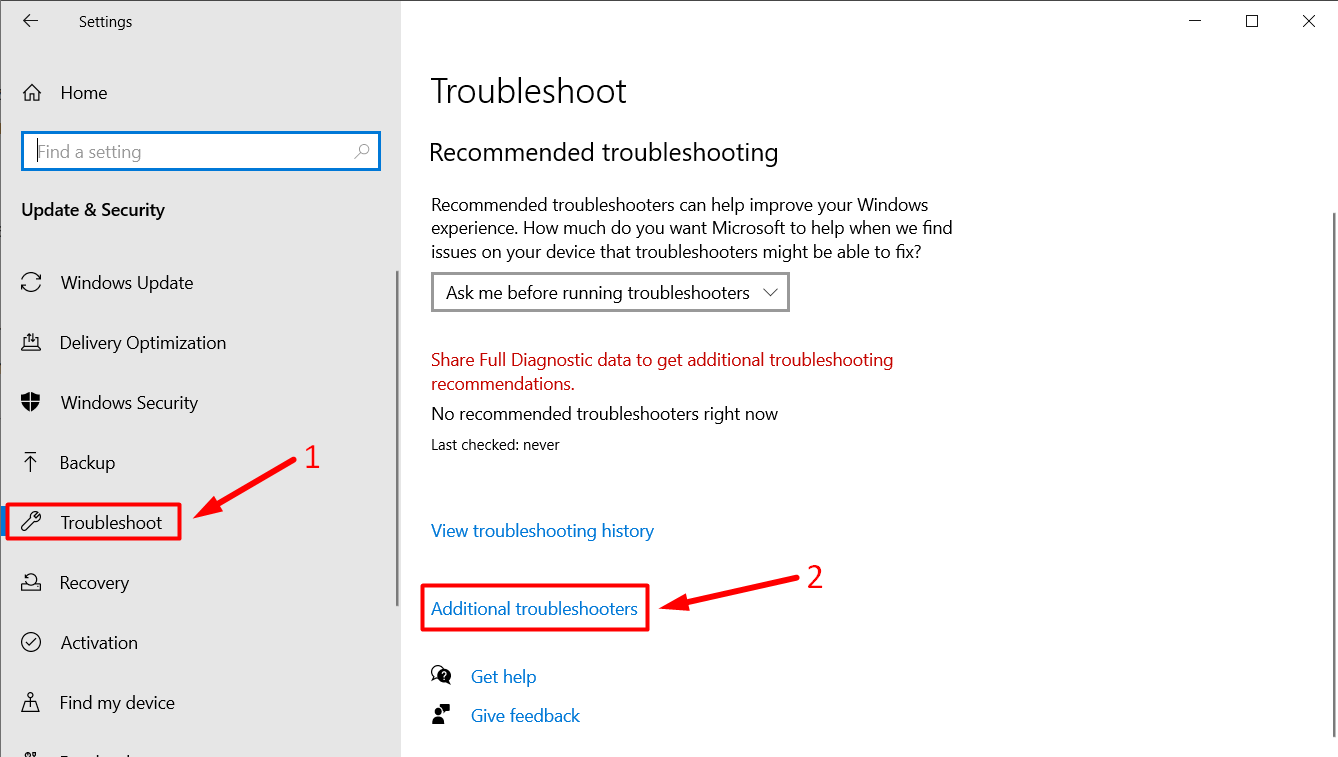
- Click Start and go to ‘Settings’.

- Go to ‘Update and Security’.
- Click ‘Troubleshoot’ and then click ‘Advanced Troubleshooters’.
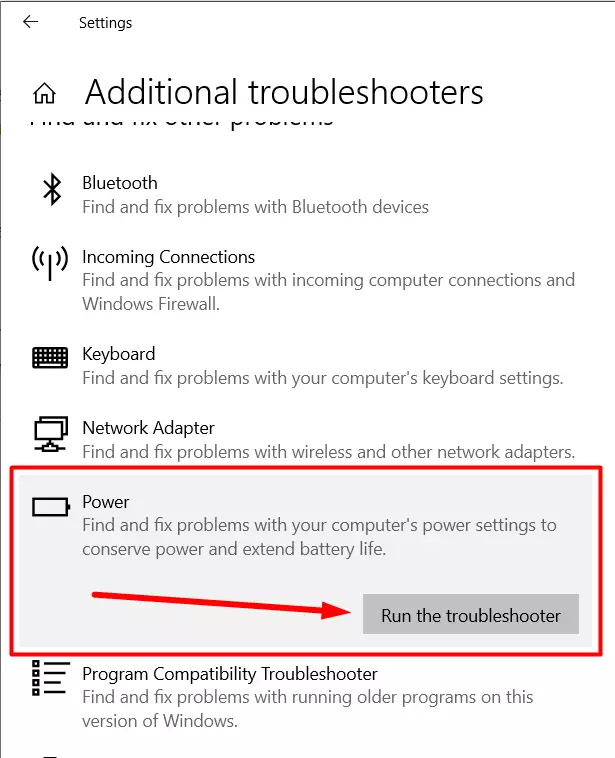
- Scroll down and find ‘Power’ and click ‘Run the troubleshooter’.
- After Windows fixes everything you will get a notification with the fixes and now you have to click ‘Next’ or if you don’t have any errors click ‘Close’.
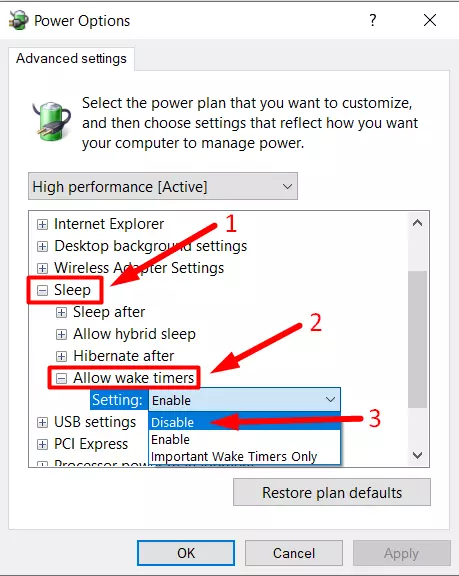
How to disable wake-up timers that can wake up the PC
Another setting that could cause your PC to wake up could be wake-up timers. You need to change these settings and to do this you need to:
- Go to ‘Control Panel’
- Select ‘System and Security’
- Then you need to click on ‘Power Options’
- Now you need to select ‘Edit Plan Settings’
- Now in the power settings select ‘Sleep’ then click on ‘Allow wake timers’ and select ‘Disable’
Also, many users find it helpful to change the power setting of the multimedia. To do this you need to:
- Go to ‘Power options’
- Scroll down a bit and select ‘Multimedia settings’
- Then click on ‘When to share media’
- Now select ‘Allow the computer to sleep’
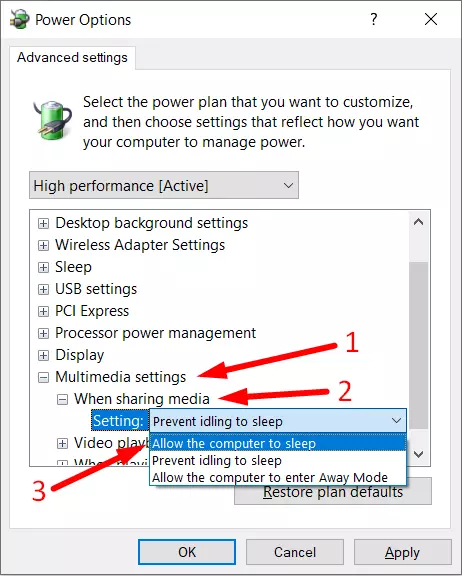
- Press ‘Apply’ and ‘OK’
How to disable the quick start that can interrupt sleep mod
One of the features that can cause sleep mode interruption is the quick startup. Most often this feature can cause the night mode to not work properly on older laptops. To disable quick startup you need to:
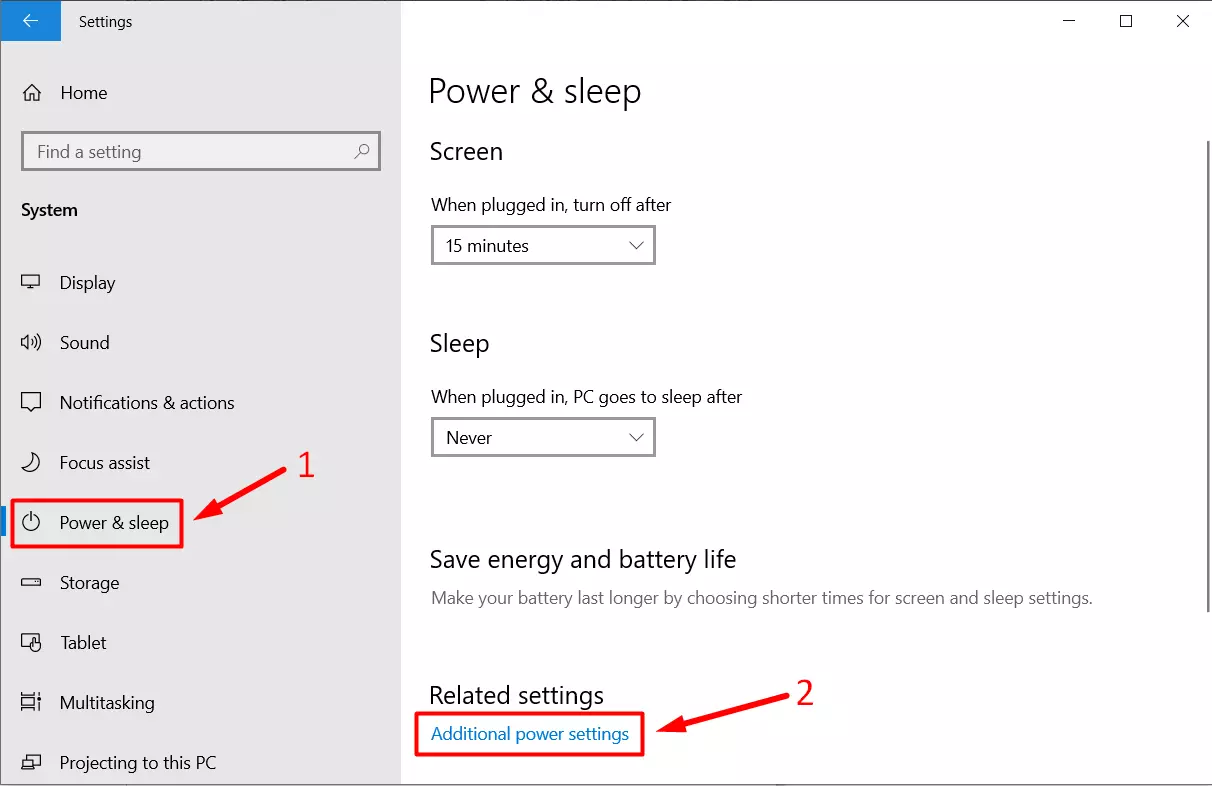
- Click Start and go to ‘Settings’.
- After the Settings menu opens, go to ‘System’.
- Now select ‘Power & Sleep’ and go to ‘Additional power settings’.
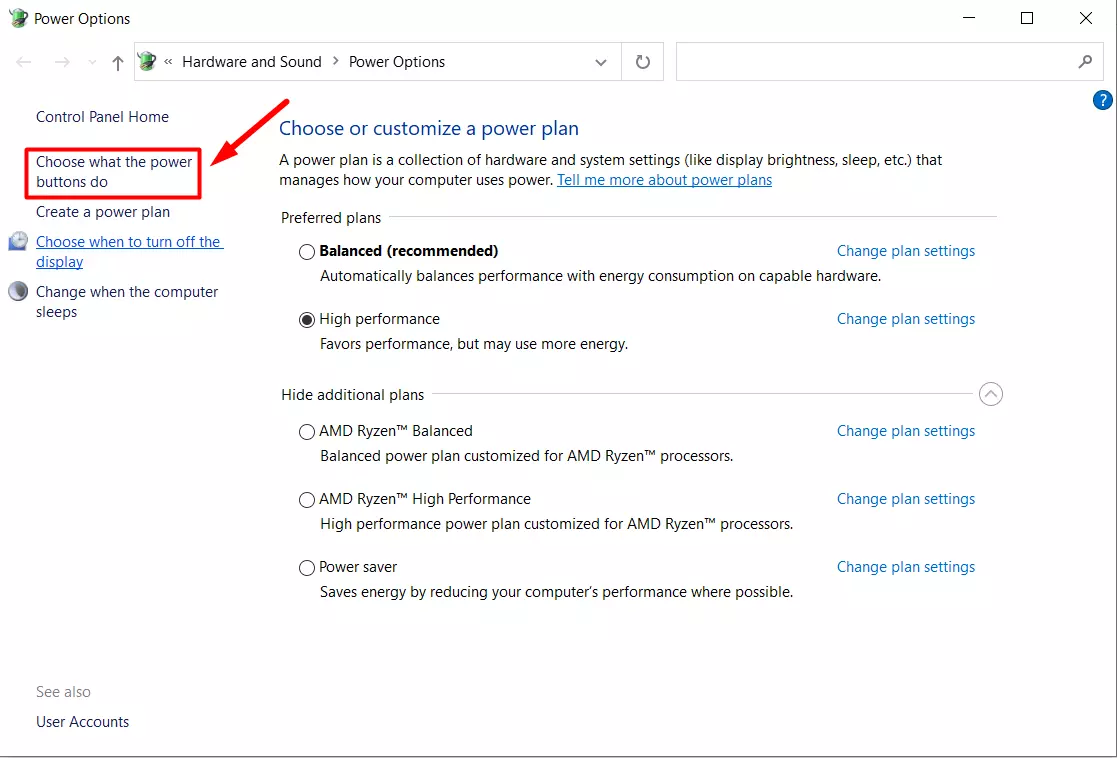
- Now press ‘Choose what the power buttons do’.
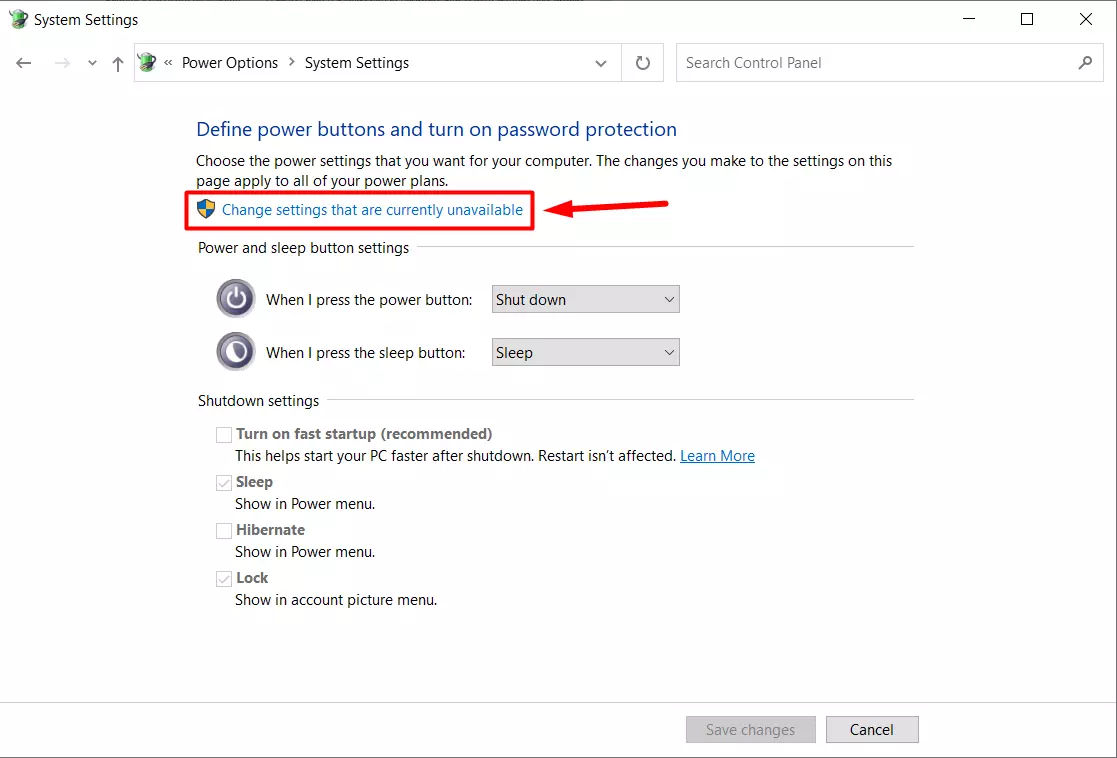
- To change your shutdown settings you need to click on ‘Change settings that are currently unavailable’.
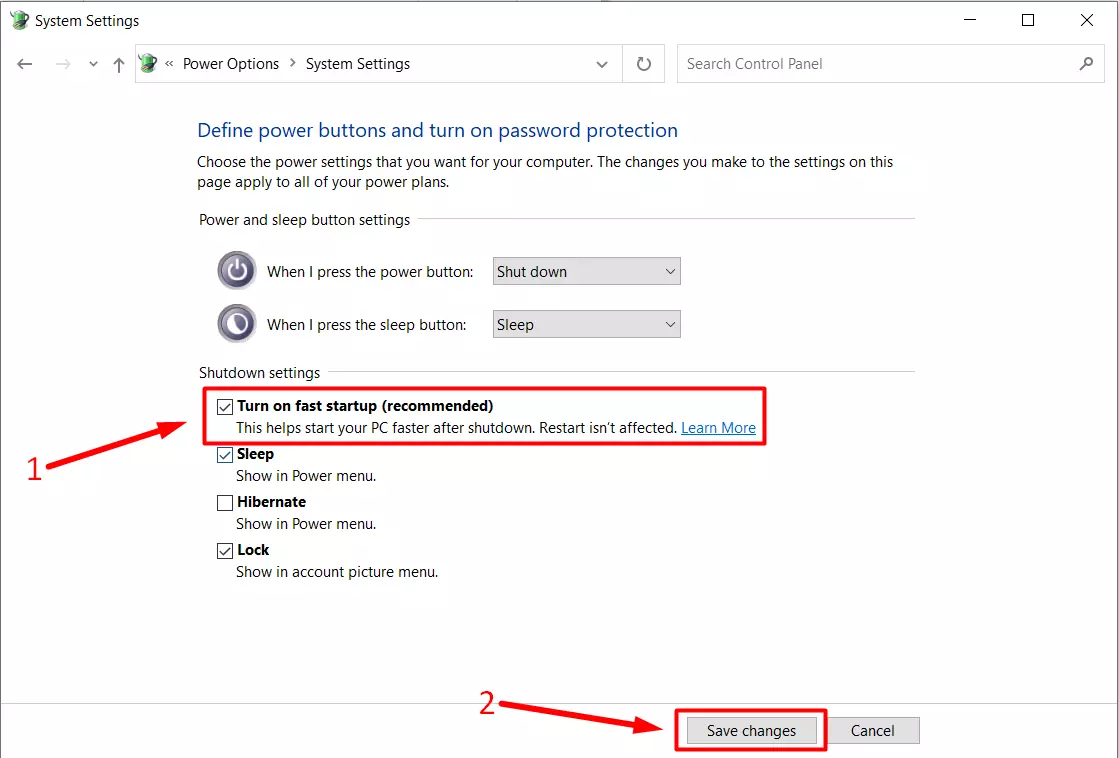
- Now you can change the shutdown settings and you need to uncheck the ‘Turn on fast startup’ and click ‘Save changes’.
Other methods that can help to fix the interruption of a sleeping mode
There may be a variety of reasons why your PC or laptop cannot enter hibernation mode or why this mode is often interrupted. Below you can read briefly about other causes and solutions to this problem.
What is a clean boot of Windows and how it can fix a sleep mode problem
Sometimes third-party apps can be the reason why your PC keeps coming out of sleep mode. To check if this is the case, you can do a clean boot. This boot only starts your computer with basic Windows programs and services. Therefore, you can easily check if the problem is with a particular app. If you don’t know how to perform a clean boot in Windows, you can read it here.
How viruses can cause sleep mode problems and how to fix it
Viruses can cause your notebook or PC to come out of sleep mode all the time. This happens because most viruses activate different adapters or apps on your PC. Also, viruses can affect the Windows 10 sleep node.
To fix this situation, you need to scan and remove viruses from your PC. You can use third-party antivirus, but now windows defender does a great job. If you don’t know how to use built-in antivirus you can read here.
Upgrade your Windows
Sometimes it can help to update your windows to solve the sleeping mode problem. This is because some drivers can’t update to the latest version and this causes a conflict between the device and the PC and the sleep mode is interrupted.
Updating Windows isn’t difficult, but if you don’t know how to do it, this guide from Microsoft will help you.


