For as long as I’ve been using e-mail, Gmail has always been in the lead. A user-friendly service with an accessible and easy-to-understand interface. With these advantages, a lot of people use it and not all of them and not all of them use it for its intended purpose. It isn’t uncommon for people to get spam in their inboxes, sent by spammers or by people that are simply getting fun by sending some tricky emails.
In such cases, to avoid further discomfort, Gmail provides blocking incoming messages from unwanted users. In fact, there is more than one way to block someone, and we’ll look at them all.
How to block email from a sender in Gmail
The first method is the most convenient and easiest. You can use it as soon as you receive a message from the sender you want to block. The first method is the simplest to use:
- Select a message in your inbox from the sender you want to block.
- After clicking on the message, click on the three vertical dots to the right in the corner of the message window.
- As soon as a new window pops up, select “Block (nickname)”.

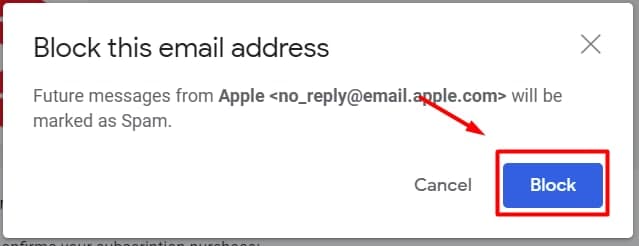
- Confirm the block in the confirmation window. To do this, click “Block”.

In this way, all messages of this user will now go to spam. If you need to unblock the user, repeat all steps, except for the third point. Instead of “Block (nickname)” click on “Unblock (nickname)”. To do this, open a message in Spam.
How to block senders in Gmail using filters
The second method is slightly different from the first. To block the user, you will need to make a simple filter setting. To do this you have to:
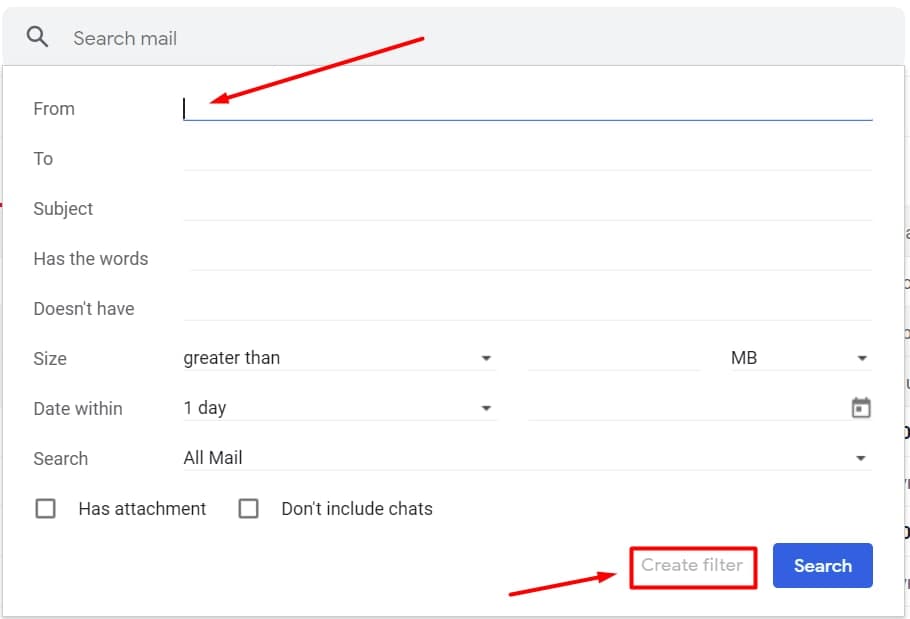
- Go to your inbox and click on the settings icon to the right of the search line as shown in the picture.
- Then in the column “From”, you must enter the e-mail address you want to block. If there are a few of them just write the senders’ addresses, sepparating them with coma. The task is also simplified as when you enter the first letters of the address there is a list of matches and you can choose the right one.

- Click on “Create Filter” at the right-bottom.
- You should go to the list of possible filters after this. Select “Delete it”.

- Click “Create Filter”.
But mind that after selecting this option all incoming and outcoming emails with the sender you select will be deleted from your account.
How to change already existing filters
There is also a way to customize existing filters. You can do this via your account settings. The steps are as follows:
- Click the settings icon at the top right of Gmail.
- When the window on the right appears, click “see all settings.
- When you get to settings, select the “Filters and Blocked Addresses” tab.
- Inside the tab, under “The following filters are applied to all incoming mail” will be the active filters. Clicking the “edit” button to the right of the filter will allow you to make adjustments using the second method.
That’s all you should know about how to block a sender’s email in Gmail.
This article was written by Vladimir Sereda and was reviewed by Vladislav Sheridan, a Managing Editor at Splaitor, according to Splaitor’s Quality and Fact-Checking Policy.
Featured image credit: Insider


