
To communicate freely with people in Discord or via Zoom, you need not only a camera, but also a working microphone. Sometimes it happens that the microphone on your Windows 11 PC may be turned off for some reason. However, you can easily get things back to normal and turn the microphone back on.
The good thing about microphone management in Windows is that you can allow and deny microphone access to any app. So you can allow trusted apps to use the microphone while denying access to all other apps. Anyway, it’s easy to turn on a microphone on Windows 11, and here’s how.
How to activate the microphone on Windows 11
If you want to turn on the microphone on your Windows 11 PC, you can follow these instructions:
- First of all, go to the Settings menu by pressing the “Win + I” keys combination.
- Then go to “Privacy & Security”, scroll down and select “Microphone”.
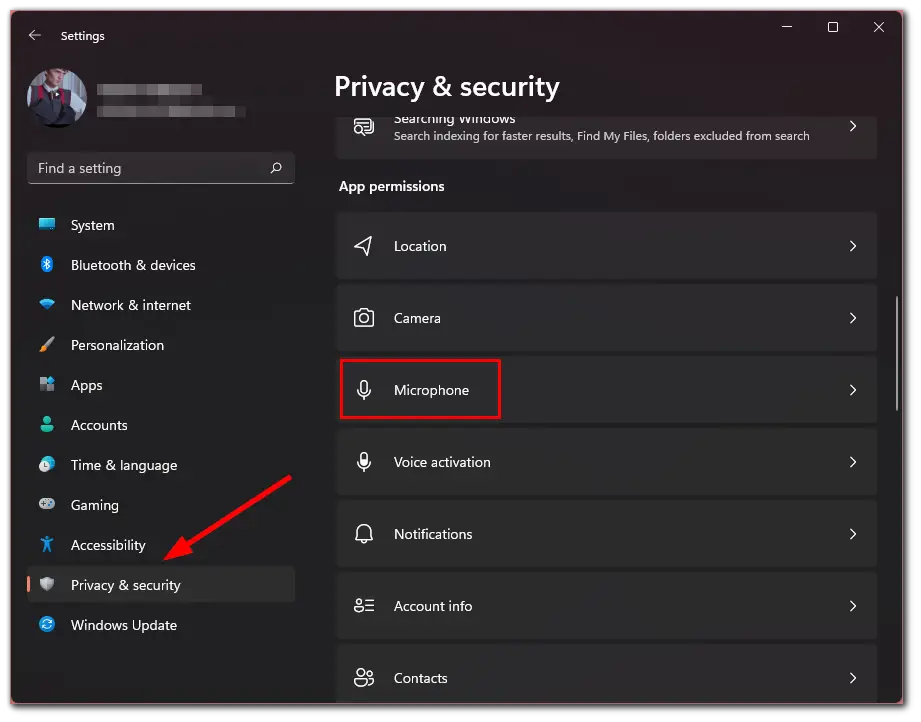
- After that, enable the “Microphone access” option.
Once you have completed these steps, your microphone will be ready to use.
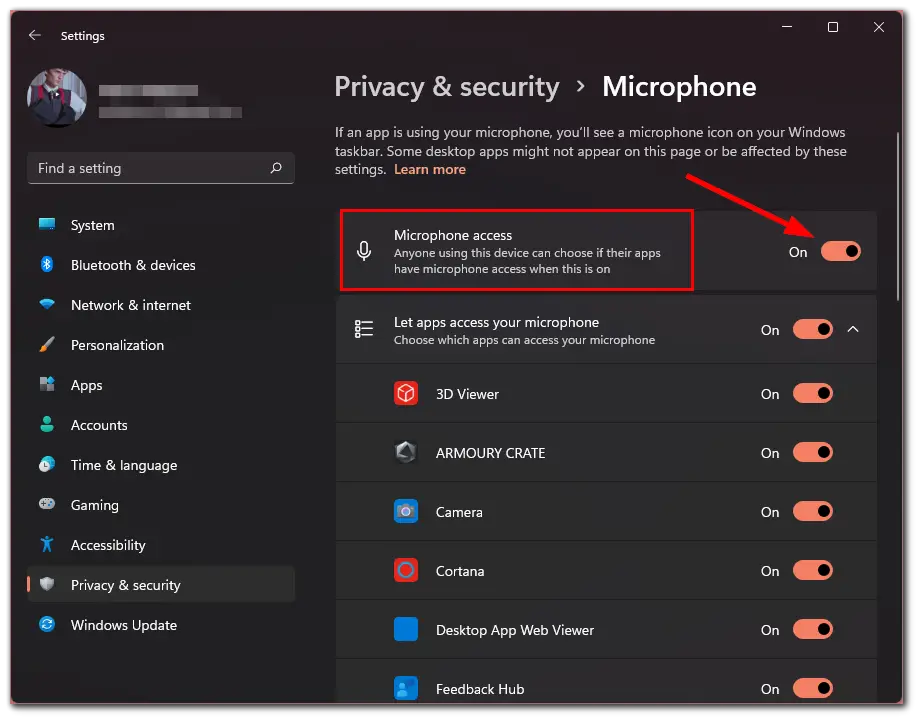
If you want to allow both Microsoft Store and non-Store programs and apps to use your microphone your need to enable the “Let apps access your microphone”. On the same page, use the switches next to the apps to allow or deny microphone access for each app.
What to do if the microphone doesn’t work on Windows 11
The first thing to check when you have problems with the microphone is some settings in Windows 11, especially often it helps if the microphone stops working after an upgrade or a clean installation of the system. To fix the problem, follow these steps:
- Go to the Settings menu by pressing the “Win + I” keys combination.
- Then go to “Privacy & Security”, scroll down and select “Microphone”.
- Enable “Let apps access your microphone” and “Let desktop apps access your microphone”.
- If the program that does not work Microphone is in the list, enable microphone access for it.
- It is also recommended to enable the “Desktop App Web Viewer” option to enable the microphone for some classic programs that use web technologies in their work.
- If these steps don’t help, go to the “System” and open the “Sound” options. Make sure that the correct microphone is selected under “Input”. Also, check that it’s not set to zero volume.
- If the correct microphone does not appear under “Input”, but it does in the Device Manager, on the same options page at the bottom, go to “All sound devices”. If the correct microphone is there, click on it, and then under “Allow apps and Windows to use this device for audio” click “Allow”.
As a rule, if there are no problems with the sound card drivers and the devices work properly, one of the above steps solves the problem.
However, it is possible that at the system level one microphone is set as a recording device and another one as a communication device (even if there is only one physical microphone), as a result, it can work properly in some programs and not in others.
How to check the microphone settings in the program
Some programs have their microphone settings, usually located in the audio, communication, and recording settings. These settings may differ from the system settings and sometimes reset spontaneously. In case the microphone doesn’t work in a particular program or game, try to find the appropriate setting and select the correct microphone.
Read Also:
- How to use your phone as a microphone on a PC
- How to troubleshoot too quiet microphone on Windows 11
- How to fix AirPods microphone not working
How to check the microphone in Windows 11 Device Manager
It is possible that the problem may be with the sound card drivers because the functioning of the microphone depends on these drivers. Use the following steps:
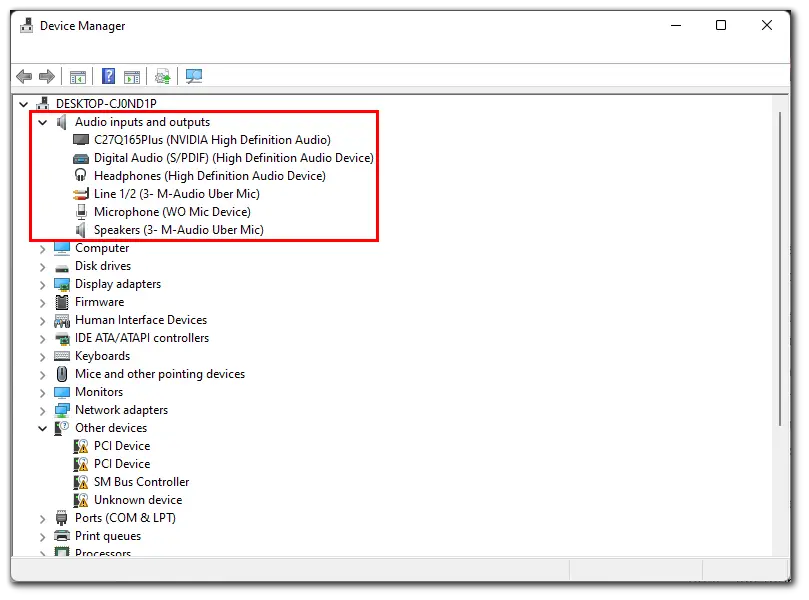
- Open Windows 11 Device Manager by right-clicking on the “Start” button and selecting the appropriate context menu item.
- Open the “Audio inputs and outputs” section and check if the desired microphone is displayed there.
- If the microphone is in the list, but there is a yellow exclamation mark next to it – try right-clicking on it, select “Uninstall device”, confirm it, and then click “Action” and “Update Hardware Configuration” in the main Device Manager menu.
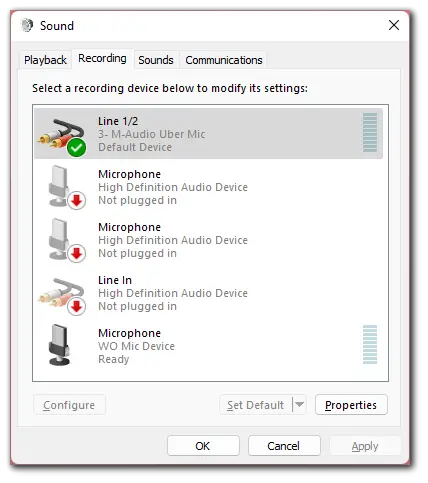
- If the microphone is displayed without any icon but still does not work, press “Win + R” on your keyboard and type “mmsys.cpl”, and press Enter. If in the Sound window on the “Recording” tab the desired microphone is displayed with a gray arrow icon, right-click on it and select “Enable” in the context menu. If the arrow is red – from the system point of view the microphone isn’t physically connected to the PC.
The absence of a microphone in the list may indicate that there are problems with the sound card drivers, the connection, or the microphone. First of all try this approach (attention: sound may be lost on your PC):
- In Device Manager, under “Sound, video, and game controllers” remove your sound card, and then click “Action”
- Select the “Update Hardware Configuration” main menu item to reinstall it.
If the previous step didn’t help, try to manually download sound card drivers from the PC motherboard manufacturer’s or laptop manufacturer’s site for your model and install them – usually, this solves the problem.


