
The context menu in Windows 11 has a new design. You will see new features when you right-click on a desktop, folder, or file. However, the developers limited it to make the pop-up menu smaller.
Many users don’t like this innovation, so they want to return everything to the way it was in the good old Windows 10. It’s actually straightforward to do. You just need to click on the Show more options.
However, not everyone is still satisfied with constantly clicking on this option to reveal the full context menu. Fortunately, you can enable the old context menu to always open in the default design.
So here’s how.
How to restore the old context menu in Windows 11 using a third-party software
This is probably the easiest way, which is suitable for beginners and those who don’t want to bother. Download the free utility Windows 11 Classic Context Menu. It doesn’t require installation; just extract it from the archive. Then follow these steps:
- Launch the program.
- SmartScreen’s system app filter may be triggered.
- In this case, click More info and select Run anyway.
- The app will now open.
- Click Enable Win11 Classic Context Menu Style.
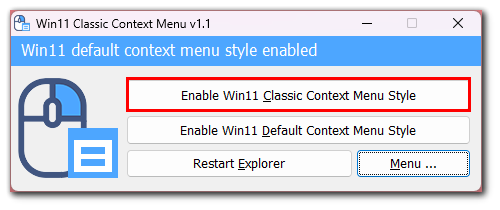
- The program will ask you to reload the explorer. Let it do that.
- You can also click Restart Explorer on your own.
Now the context menu in Windows 11 will look like in 10th and become more familiar and comfortable. You can restore the initial version by clicking Enable Win11 Default Context Menu Style and selecting Restart Explorer in the program if you want.
How to restore the old context menu in Windows 11 using the Registry Editor
This method is more suitable for advanced users who like to do everything with their own hands. In this case, the tool is Registry Editor. So here’s how it works:
- First, press Win + R on your keyboard to open the Run window.
- Then enter “regedit” and press Enter.
- After that, in the Registry Editor, open the section (i.e., folder) in the sidebar at:
- HKEY_CURRENT_USER\Software\Classes\CLSID
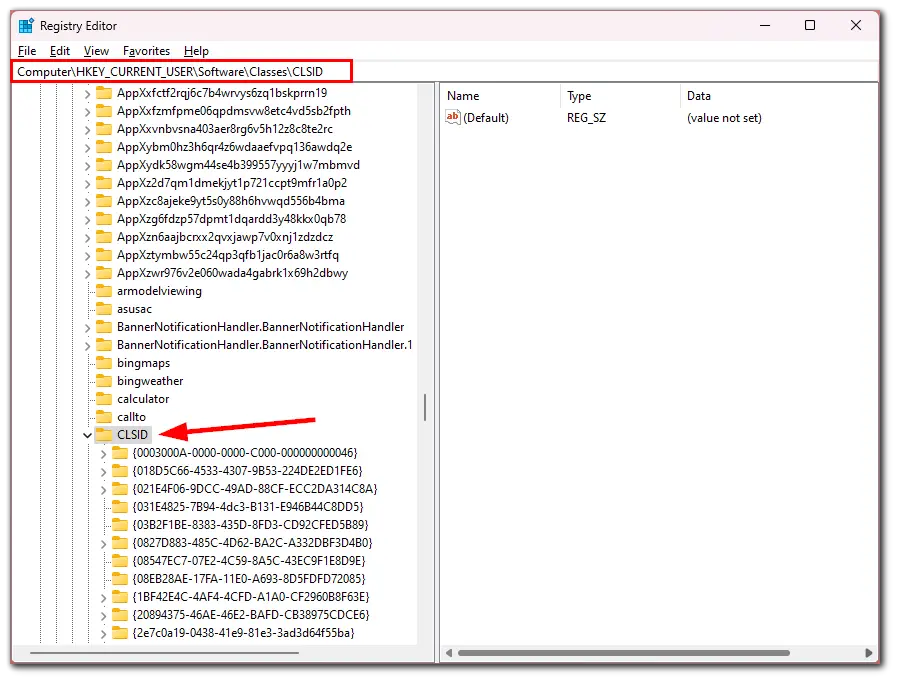
- Right-click CLSID.
- Next, click New and select Key.
- Enter the name:
- {86ca1aa0-34aa-4e8b-a509-50c905bae2a2}
- If a folder with this name already exists, you don’t need to do anything.
- Now, right-click on this folder and, using the same way, create the InprocServer32 subfolder.
- Left-click on InprocServer32, double-click on the “Default” value, and click OK without making any changes to the blank line.
Once you have completed these steps, reboot your PC. That’s it, and now the familiar menu is back in place.
If you want to use the menu from Windows 11 again, search the registry editor again. Go to the same folder and delete {86ca1aa0-34aa-4e8b-a509-50c905bae2a2}. Finally, reboot your PC.
Read Also:
- How to use 7-Zip in Windows 11
- How to crop or trim video on Windows 11
- How to open Terminal on Windows 11
How to restore the old context menu in Windows 11 using the command line
It is an option for those who don’t want to download and install third-party programs and use the Registry Editor. So do the following:
- Open the Start menu and type Command Prompt in the search field.
- Right-click on the found program and click Run as administrator.
- In the window that opens, enter the command:
- reg.exe add “HKCU\Software\Classe \CLSID{86ca1aa0‑34aa‑4e8b‑a509‑50c905bae2a2}\InprocServer32” /f /ve
- Press Enter.
Restart your PC, and you will see that the context menu is now like in Windows 10. If you want to cancel your decision to use the old context menu, use this command: reg.exe delete “HKCU\Software\Classes\CLSID{86ca1aa0‑34aa‑4e8b‑a509‑50c905bae2a2}” /f
If the changes don’t appear immediately or the wallpaper is reset on the desktop, a simple reboot will fix it.


