Thanks to the many security features on your iPhone, you can rest assured that your data is safe. However, your iPhone will warn you if you are connected to an insecure or unreliable network.
Sometimes you can see a privacy warning message under your Wi-Fi network name in settings. Apple added this feature in iOS 14, but many users, even today, don’t understand why. In short, it relates to your Wi-Fi router’s privacy and security settings.
So here’s how it works in more detail.
What does the Wi-Fi privacy warning mean on an iPhone?
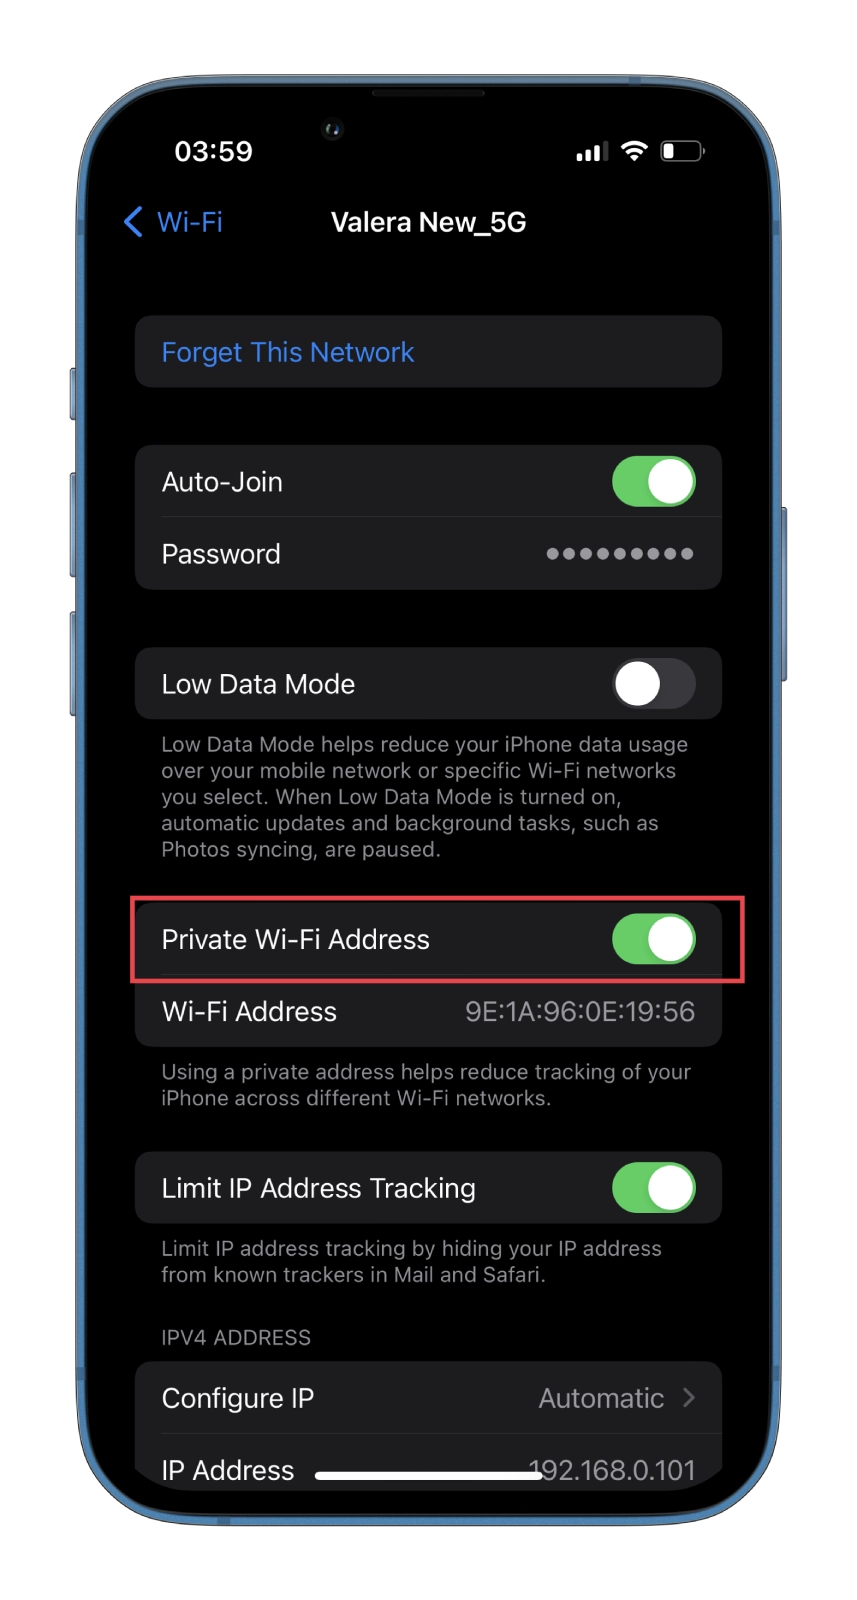
There are several reasons why you may see this warning. If you tap on the (i) icon next to the Wi-Fi network name, you will see more information about it. Here are two common messages you may see:
- Private Wi-Fi Address is disabled for this network.
- This network is blocking encrypted DNS traffic.
You can usually resolve these messages similarly. As we know, Apple is very protective of the privacy of the information on its devices. To that end, to improve privacy, your iPhone or iPad uses a different Media Access Control (MAC) address for each Wi-Fi network you connect to.
If you see this message, your MAC address isn’t masked, and the network you’re connected to can see your MAC address. It means someone could intercept the data you’re transmitting over the Wi-Fi network.
The good news is that your iPhone or iPad is pretty secure, but the websites you visit can be tracked. It is especially problematic if you are connected to a public hotspot.
How to fix the Wi-Fi privacy warning on your iPhone
If you want to solve this problem on your iPhone, you can follow these steps:
- Open Settings and go to Wi-Fi.
- Then tap on the Wi-Fi network name to open its settings.
- After that, enable the Private Wi-Fi Address option.

Now reconnect to your wireless network. Go to the Wi-Fi settings and click on the network name again to join it. You can also try to forget your network, reboot your iPhone and connect to Wi-Fi again.
If you already have the Private Wi-Fi Address option enabled, turn it on/off, and then be sure to reboot your iPhone once. This will remove the privacy warning notification from the Wi-Fi network.
What is Wi-Fi encryption?
As you are probably aware, encryption in Wi-Fi routers is used to protect your Internet traffic from tampering. This prevents your traffic from being intercepted, saved, or altered by third parties.
Without encryption, anyone who manages to break the security of your connection to the router will be able to see your browsing history, see the sites you’ve visited, analyze the apps you’ve run, and generally get as much data about you as possible, including your geographic location.
Wi-Fi routers use unique encryption protocols to protect traffic from interception. The best known are:
- WPA
- WPA2 TKIP
- WPA2 AES
- WPA3
The protocols are arranged in ascending order of security. That is, WPA2 is the most insecure of the possible, and WPA3 is the most secure. There are also intermediate options, which are compromises, but often you have to use them because many users’ routers don’t support the most advanced security standards.
Read Also:
- How to hide text message alerts on iPhone
- What is Focus Status in iMessage on iPhone?
- How to clear system data on iPhone and iPad
How to change Wi-Fi encryption
Switching to a more secure data encryption protocol isn’t tricky. Still, I strongly don’t recommend following the instructions below if you’re not confident in getting things back to how they were before.
- Enter 192.168.0.0 or 192.168.0.1 in your browser.
- In the login/password fields, enter admin/admin or overwrite the login information from the back of your router.
- Select a range (2.4 GHz or 5 GHz), and then open the Security section.
- Under the Encryption tab, select WPA2 AES or WPA3 and save your settings.
- To be sure, reboot the router for the changes to take effect.
Keep in mind that router settings may vary depending on the model.


