
Windows 11 allows you to mount an internal or external drive to an empty folder. This makes the drive look like another folder. The contents of the drive will still physically reside on the drive. You will be able to access the contents of the drive through the mounted folder path. Anything you save in the folder will actually be saved on the drive.
You can only mount drives to empty folders on basic or dynamic NTFS volumes. If the folder contains content, you won’t be able to mount it as a drive in Windows 11. There’s nothing complicated about mounting a drive in a folder in Windows 11. Here’s how you can do this.
Why do you need to mount the drive as a folder in Windows 11?
Every time Windows detects a new drive, or you add a new drive yourself, it is assigned a letter. This helps to distinguish between the different amounts of storage available on your PC or laptop.
If you have multiple drives or disk partitions, it can sometimes be difficult to find the drive you want by letter alone. So it is easier to mount them as desktop folders and then give each folder a descriptive name. This is especially useful if the computer is used by someone else besides you.
How to mount an unallocated drive or partition as a folder in Windows 11
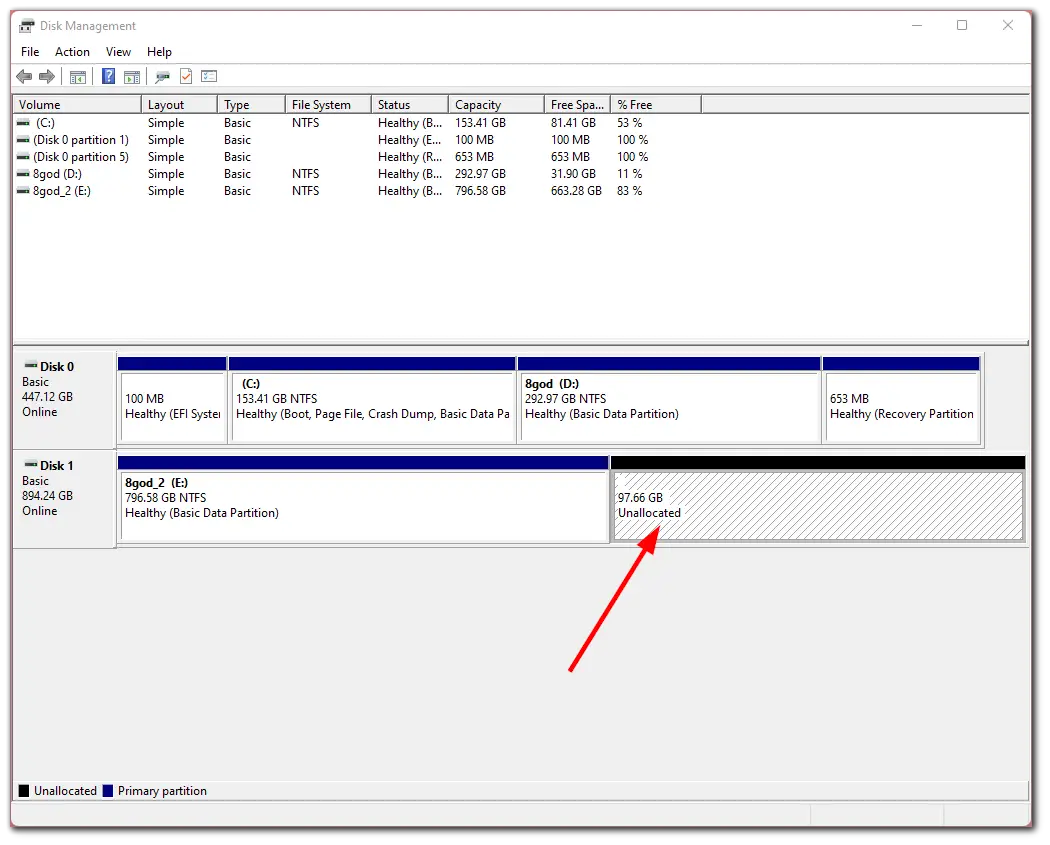
If you have a hard drive or disk partition that’s not currently assigned a letter, you can mount it as a folder. To do this you will need to use Windows Disk Management. So follow these steps:
- First of all, go to Windows Search and enter “Disk Management” in the search field.
- After that, open “Create and manage hard disk partitions”.
- Then right-click on the unallocated space and select “New Simple Volume”.
- Click “Next” and enter the size of the new volume. The minimum and maximum sizes of the volume will be displayed depending on the available unallocated space.
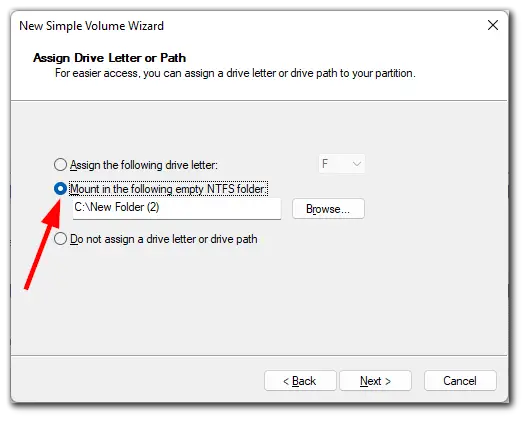
- Now, instead of selecting a drive letter to assign to the volume, select “Mount in the following empty NTFS folder” and navigate to the folder location.
- Choose “Format this volume” and give the new drive a name.
- Finally, click “Next” and “Finish”.
The folder you selected during this process is now mounted as a drive or partition. If there is no unallocated space on the hard drive that can be used in this way, you can shrink the drive to create it.
How to shrink the drive in Windows 11
If you want to shrink your drive to make an unallocated space on your Windows 11 PC, you can follow these instructions:
- Go to Windows Search and enter “Disk Management” in the search field.
- After that, open “Create and manage hard disk partitions”.
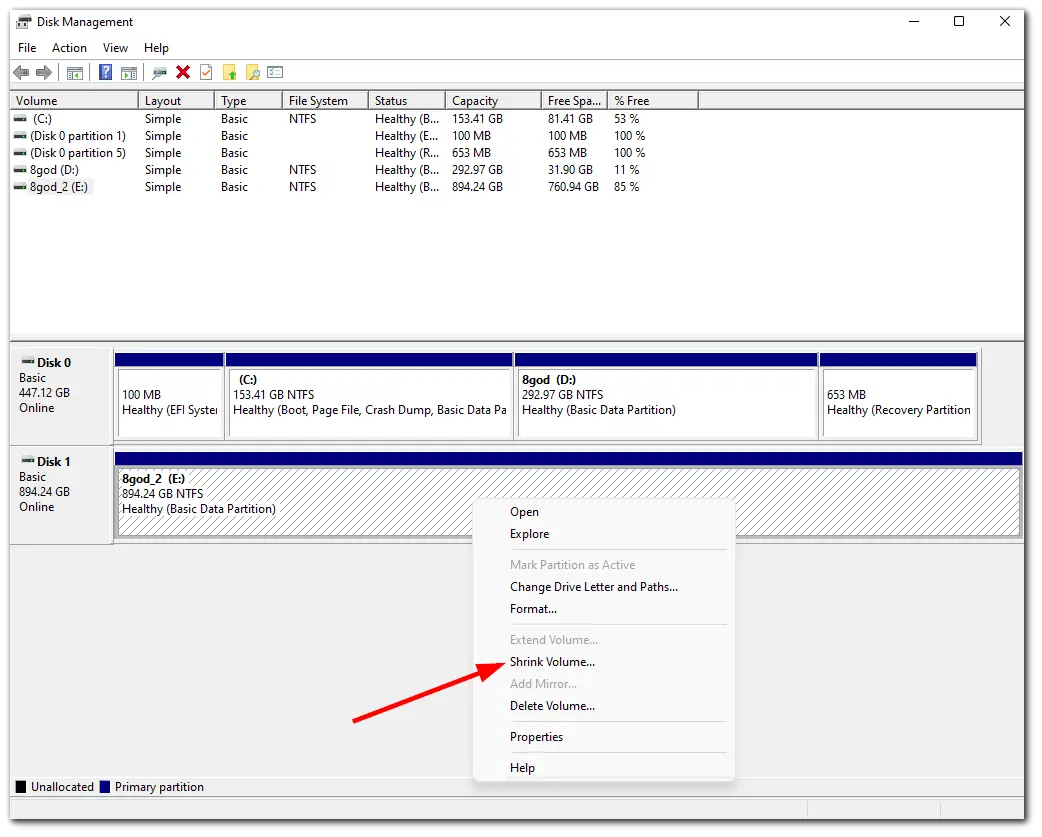
- Then right-click on the drive you want to shrink and select “Shrink Volume…”
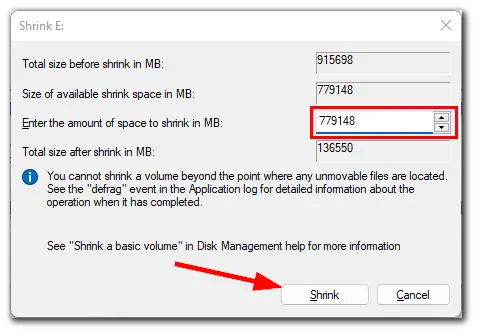
- Now, enter the size of the unallocated space and click “Shrink”.
Once you have completed these steps, an unallocated space will appear in the Disk Management window.
How to mount an external drive as a folder in Windows 11
If you want to mount your flash drive or large external hard drive as a folder, this method is for you. Just do the following:
- Open Settings and go to the “System” section.
- Then click “Storage” and select “Advanced storage settings”.
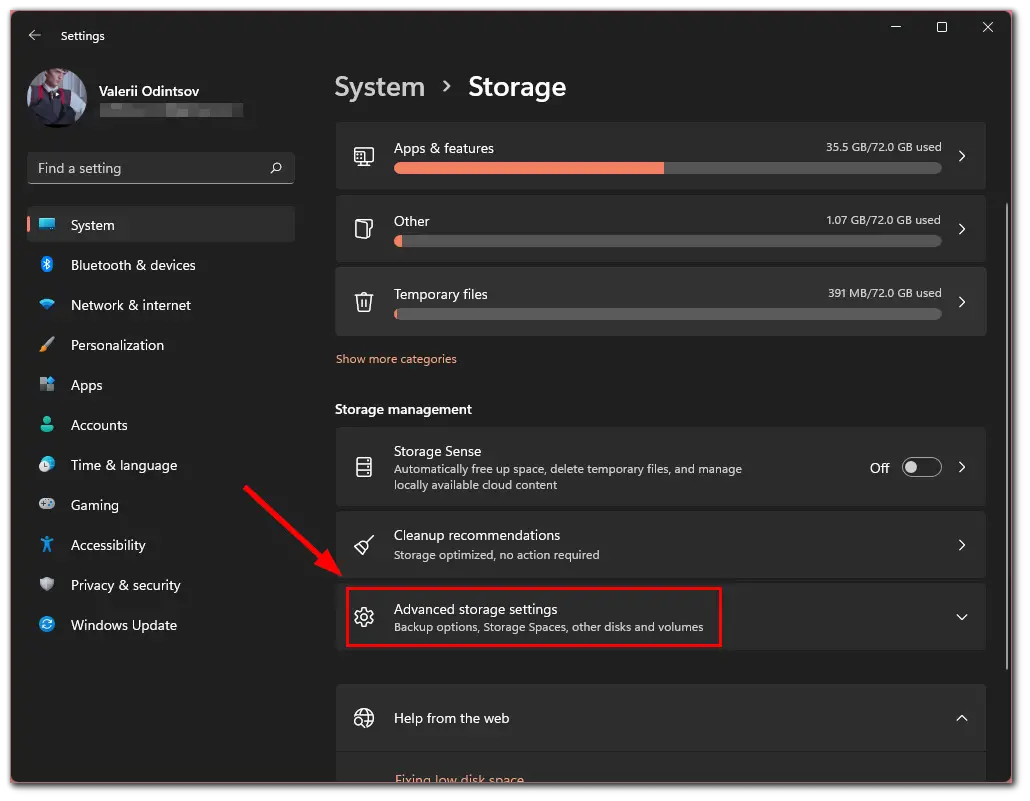
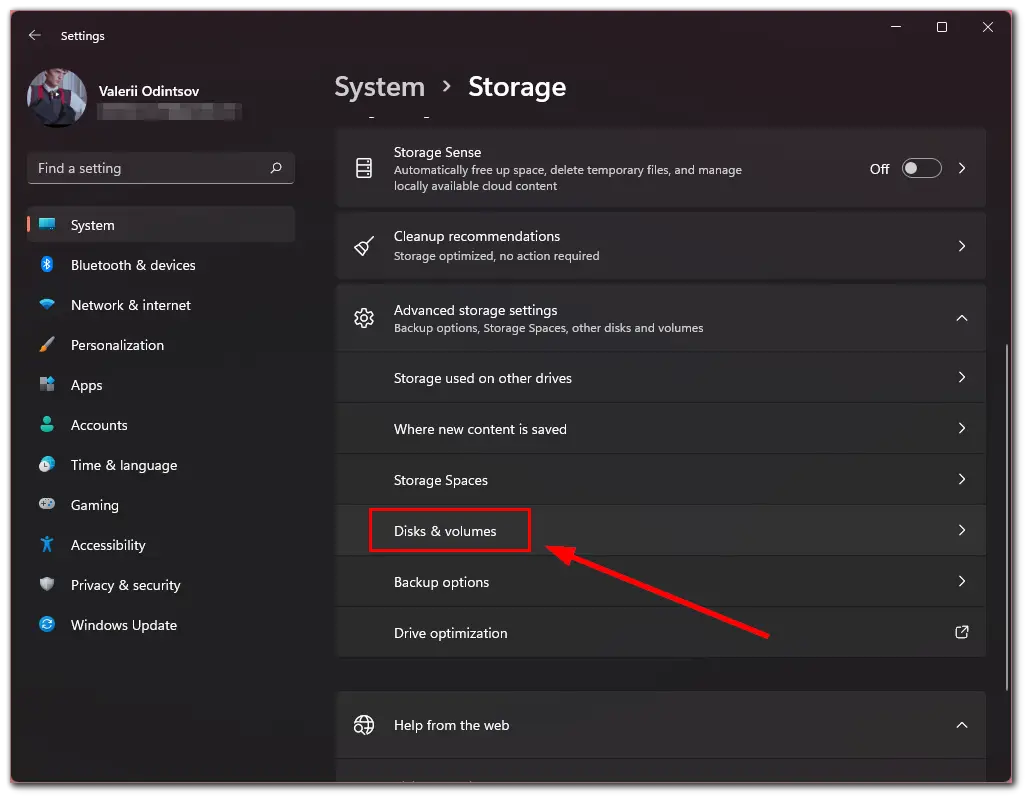
- After that, click on the “Disks & volumes” option.
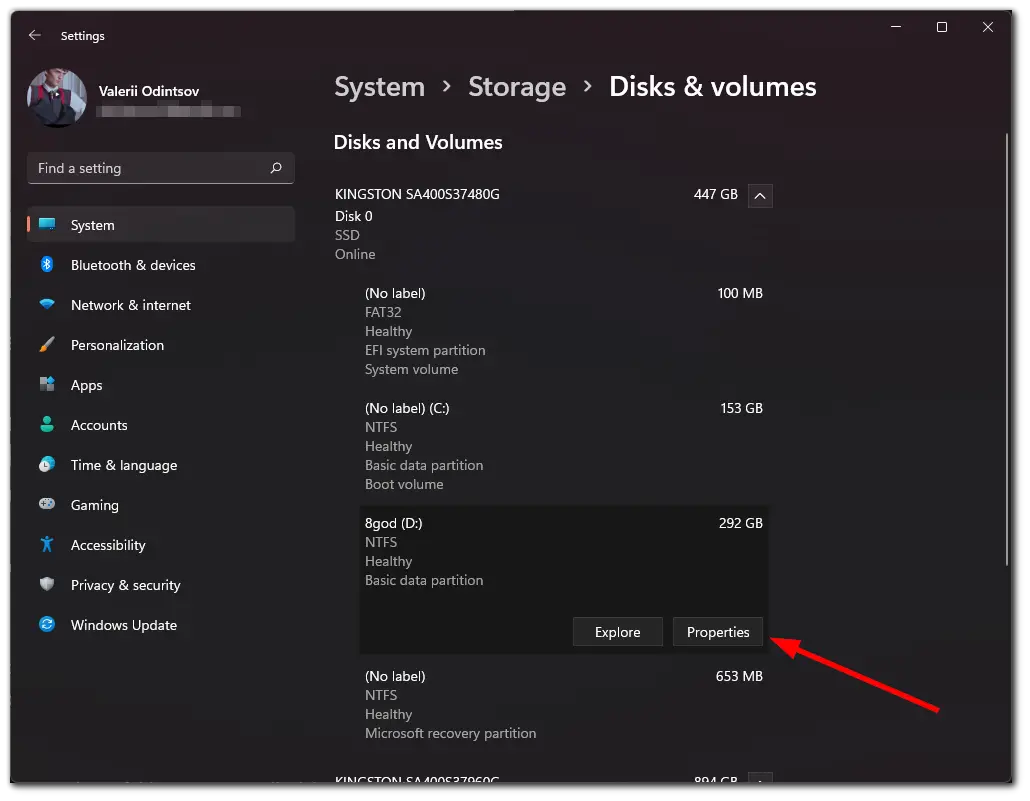
- Choose the drive and click on the “Properties” button. You will then see the details of the drive, including the assigned letter.
- Scroll down to the “Paths” section and click on the “+” button.
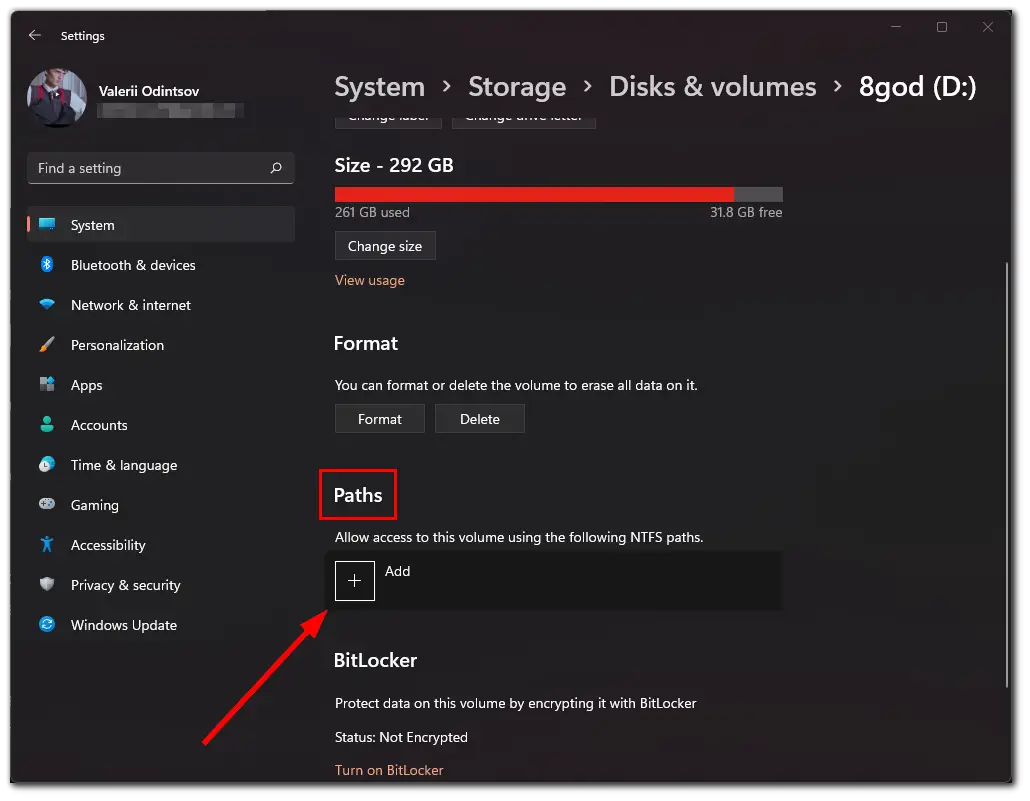
- Now, click “Browse” and go to or create a folder to mount as a drive.
- Finally, just click “OK”.
Once you have completed these steps, the new drive path will be displayed in the properties under “Paths”. The folder you select or create will look like a standard Windows folder, but everything you put in it will be stored on the drive. Once you remove the hard drive, the folder to which it is assigned won’t open until it is plugged in again.
How to delete the path to the external drive
If you no longer need the drive mounted as a folder, you can easily delete the path. Follow these instructions:
- Open Settings and go to “System”.
- Click “Storage” and select “Disks & volumes”.
- Then find the folder path in the “Paths” section and remove it by clicking “Delete”.
Now you will no longer see the folder path.
Read Also:
- 10 best Windows 11 features worth using
- How to enable a microphone on Windows 11
- How to rotate your screen in Windows 11
How to unmount a drive from a folder in Windows 11
If you want to unmount a drive from a folder in Windows 11 – follow these steps:
- Open “Disk Management” and go to the volume you mounted as a folder.
- Then right-click on this volume and select “Change drive letter and paths”.
- Choose the mounted folder you want to delete, and then click “Remove”.
- Finally, confirm that you want to delete the path.
Anyone who uses that path to access the volume will no longer be able to do so. You can also simply delete a folder to unmount it as a drive. This won’t delete the contents of the folder, but you won’t be able to access it using the path to the folder.


