Facebook is one of the most popular social networks. For anyone in today’s world, social networking plays an important role in life. Since it’s no longer just for communication and entertainment people need social networks. Now social networking is a tool for development, especially if you have a group or business page. So you should know about ways to promote and options to attract readers and a new audience of people.
Facebook has many tools to create the most comfortable and effective experience for people to communicate and promote. However, a lot of people don’t use many of the features as intended. One of the most well-known features is events. Using events on Facebook opens up a lot of possibilities for you, especially as a business owner.
What is a Facebook event
Facebook event is a feature that will work effectively more for people whose goal is to develop a page or a group. In general and for personal use Facebook events can also bring you something new and entertain your friends. However, all the same, events are more effective and practical for the development and business pages.
At the same time, it’s not one tool for development on Facebook. Quite effective are considered polls. In spite of this, it’s used for entertainment and ordinary posting but you can use Facebook polls for marketing. Since it will open up more opportunities for you and your business, it’s a good tool for communicating and engaging new customers.
In general, the events on Facebook are a great way to help people whose activities are related to the organization of various events, master classes, concerts, training, and seminars to find a new audience for your activities.
Read also:
- How to create a poll in Facebook Messenger
- How to make your photos private on Facebook
- How to share a TikTok on a Facebook
Why create an event on a Facebook business page
Events on Facebook are pretty much the same as an event in real life. You create an event on the business page with your own actions, providing all the necessary information, which ultimately leads to the fact that you get new customers and visitors. Along with this, your brand becomes more and more recognizable on the internet site. These are the most basic benefits of creating your event on Facebook.
Also today you can create an event without necessarily having to be physically present at a location. You can create an online event and leave a link to it, or you can do a live broadcast on Facebook. In that case, a lot of people are interested in how you сontrol who sees or joins the Facebook event. Study this information in more detail because once you create an event, you can’t change its privacy settings.
Also, keep in mind that just creating an event on Facebook isn’t enough to attract new customers and get the necessary growth. Sometimes people creating an event have no idea what the audience expects from them. Therefore, in such a case, it’s desirable to involve polls on Facebook. You’ll find out what your audience wants and create what they expect in return, all you have to do is see poll votes on Facebook.
What to do to create a Facebook event using an iPhone
Quite a few activities people have when they might need to create an event. At the same time it’s a good way to attract new people because once you create an event, you’re automatically added to the list of events that will take place at a certain time in a certain place. So in order to create a Facebook event using an iPhone follow these steps:
- The first step is to open the Facebook apps.
- Then you need to go to the page of your business.
- After that, select ‘Events’ in the top panel.
- The next step is to click on the ‘Create Event’ button.
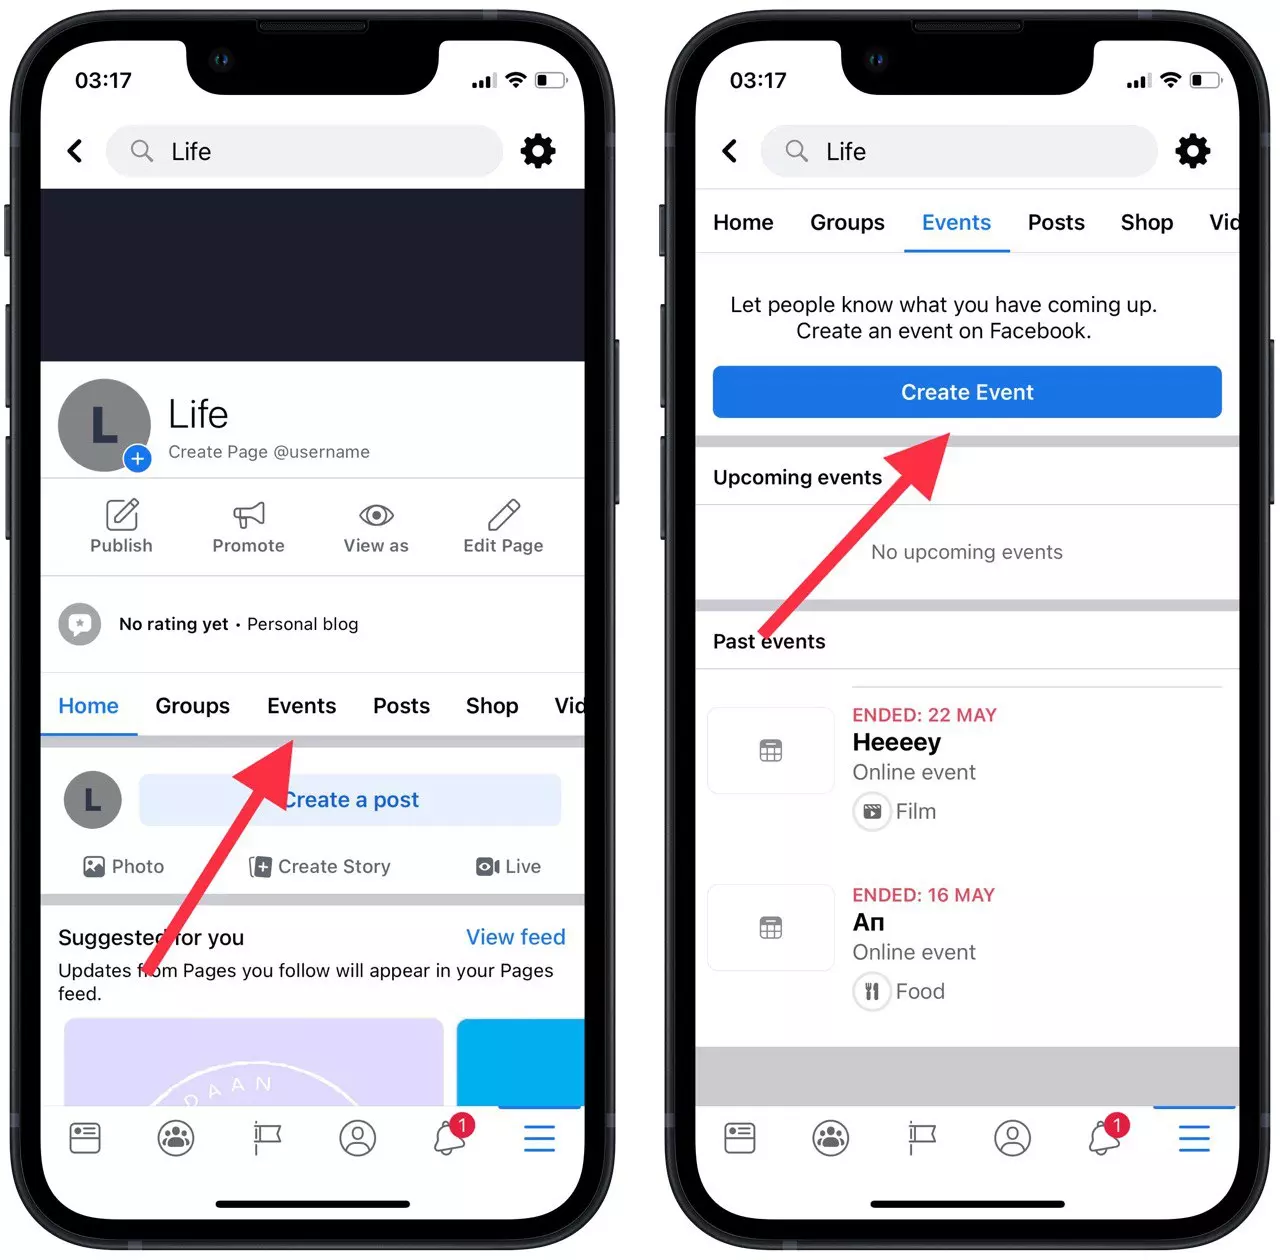
- Next, you’ll get a window where you need to fill in all the information, first select the format of the Event.
- Specify the name, time, and date.
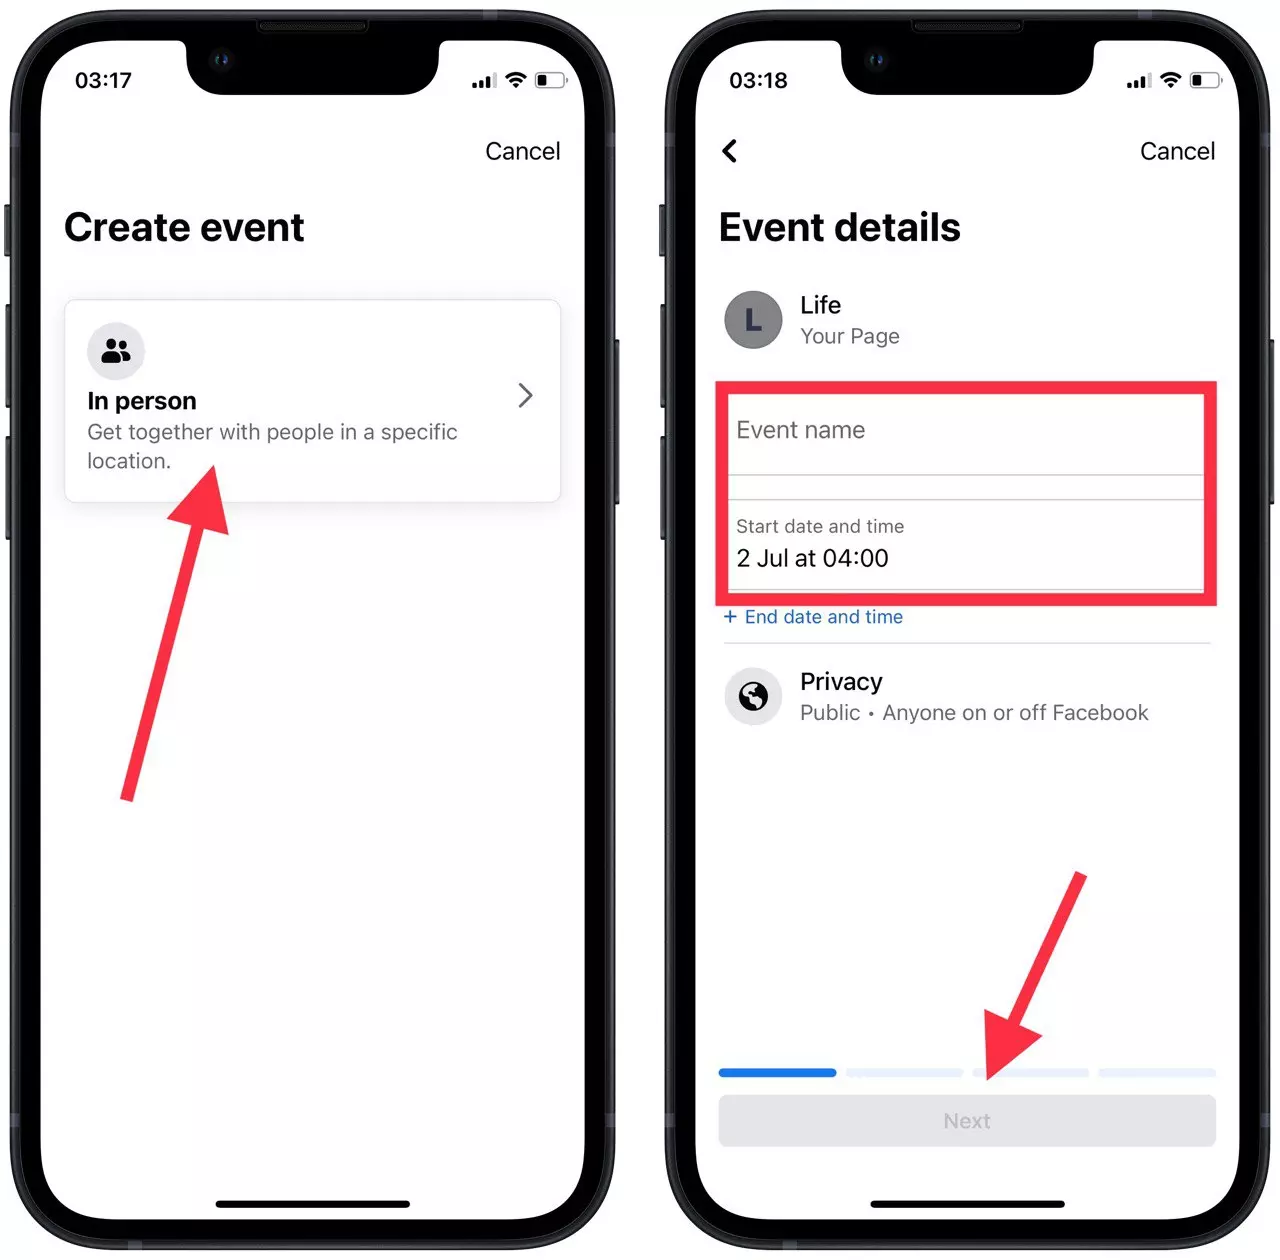
- Then you need to specify the location and add a description and category.
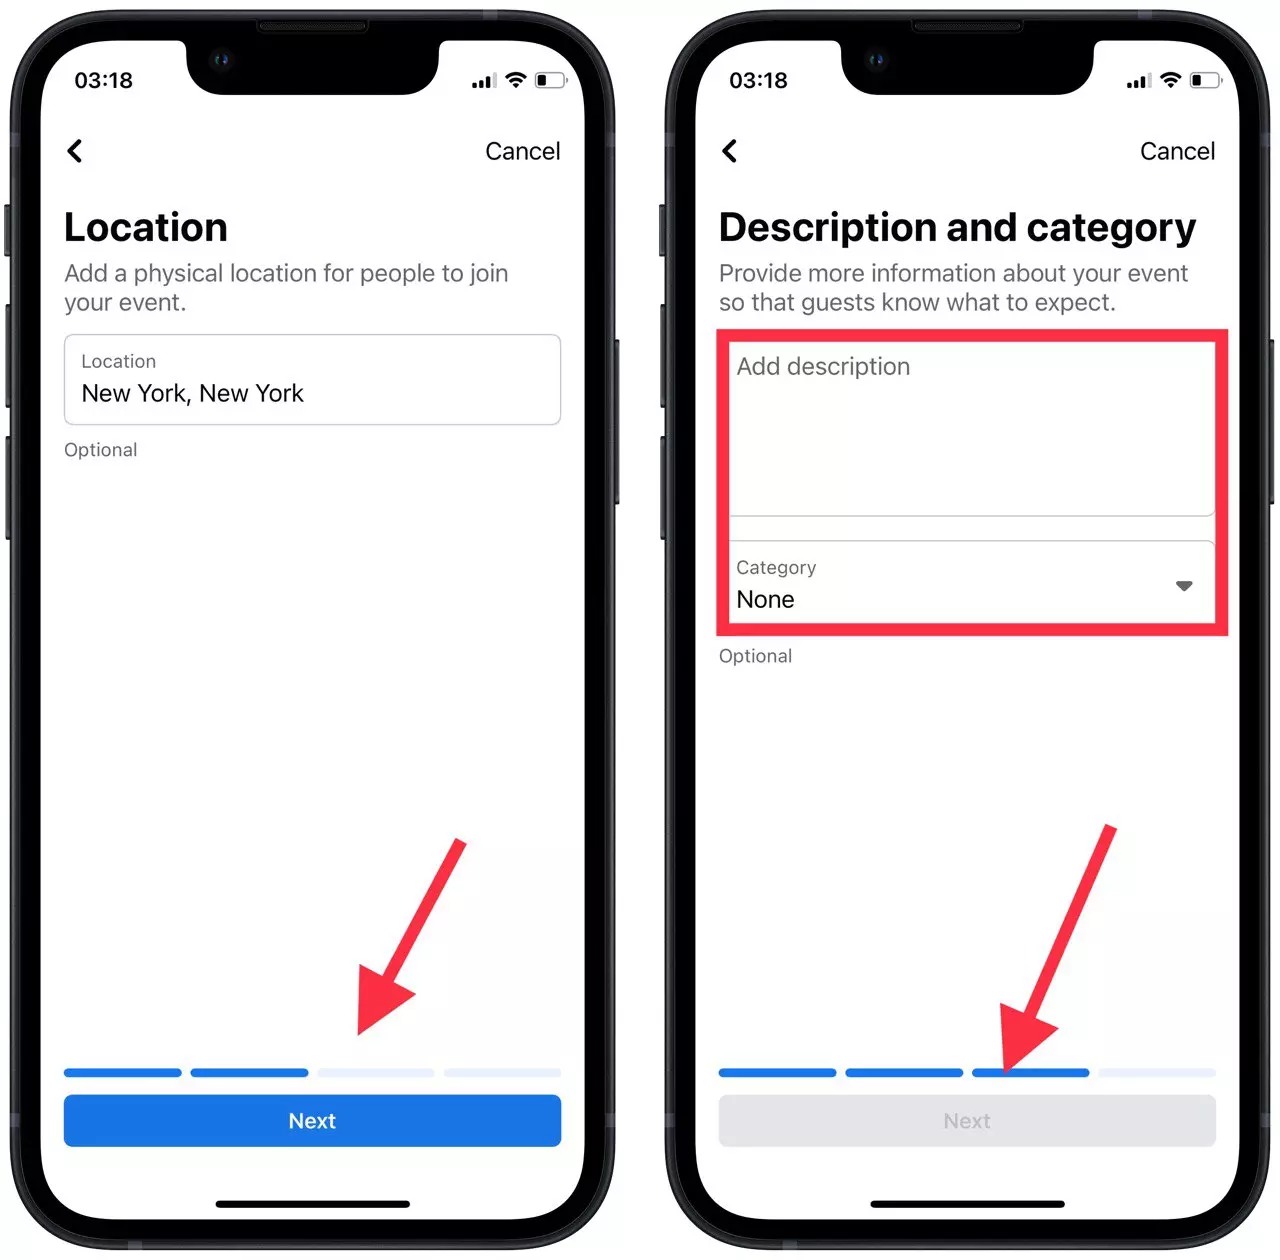
- After that, add a photo and click ‘Create event’.
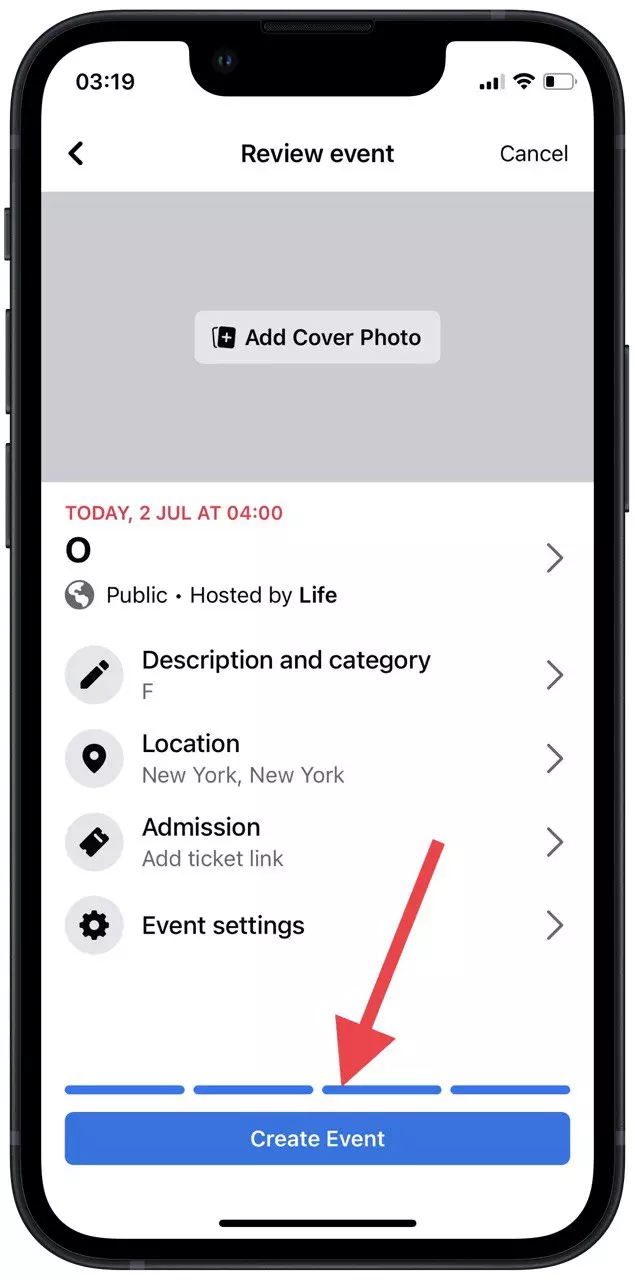
Following these simple steps, you can create a Facebook event fairly quickly. However, it’s important to note that in order for this to work, you need to enter all the information correctly.
What to do to create a Facebook event using a web browser
Along with this, quite often people use the web browser to promote their business page on Facebook. Therefore, it’s quite important for you to learn about the steps to create an event. Practically, these steps aren’t much different from the actions using an iPhone. In order to create a Facebook event using a web browser:
- The first step is to open Facebook using a web browser.
- Click on the three dots to open the list.

- Select ‘Page’ from the list.

- Then select ‘More’ in the top bar and select ‘Event’.

- Next click on ‘Create New Event’.

- After that, you need to select the format of the event.
- Next, in each window, you need to specify the date, time, name, location, category and click on ‘Create event’.

After you have followed these steps, you will see your event post published. Keep in mind that once published, you won’t be able to edit it.
Read also:
- How to create a Facebook poll in a group
- How to fix when you can’t create a poll on Facebook
- How to clear the Facebook app cache on your iPhone
How to attract the public to a Facebook event
First and foremost, in order to attract the public to a Facebook event, you must prepare quality information. That is, starting with a picture, you must create a layout that will attract people to read the text that describes the event.
Along with this text should consist of readable information. The text should be concise, because a lot of text is more likely to cause boredom than a desire to go to the event, so try to be brief. Also, all information should be correct and correspond to reality at the time of publication.
After you have prepared the information, you need to engage in the promotion to attract new people to your publication. If you have prepared low-quality text, the advertisement is unlikely to bring a lot of feedback. The main way to develop is considered embedded advertising on Facebook, use the ad manager to set it up.
Once you have succeeded in attracting new people to your event, you can duplicate a Facebook event after a while. That way you don’t have to write a new description and create a post, just click a couple of buttons.


